Imagine stepping into your backyard this spring and harvesting crisp, sun-warmed lettuce or vibrant, snap-fresh peas that you grew yourself.
Most beginners feel overwhelmed by the “when, where, and how” of spring gardening—fearing that one frost or wrong soil choice will ruin their efforts.
This guide removes the guesswork. We’ve distilled the latest 2026 climate-smart trends into a simple, actionable roadmap. Whether you have a massive backyard in Canada or a tiny balcony in London, you will learn how to build a resilient, high-yield garden from scratch.
In this complete guide, you’ll discover:
- The top 5 climate-smart vegetables for 2026.
- Step-by-step soil preparation for a chemical-free harvest.
- Modern tech-integrated watering tips to save time and money.
- How to protect your sprouts from unpredictable spring frost.
- Top 10 Easy Spring Gardening Hacks
Understanding Your 2026 Garden Climate
The 2026 season is defined by “Climate-Smart Growing.” With unpredictable spring thaws in Canada and the UK, and heatwaves hitting the US earlier, choosing resilient varieties is no longer optional.
The Top 5 Beginner Vegetables for Spring 2026
| Vegetable | Best Planting Time | 2026 Trend Variety |
| Tomatoes | After last frost | Heatmaster Hybrid |
| Spinach | Early Spring | America (Heat-tolerant) |
| Peppers | Late Spring | California Wonder |
| Potatoes | Mid Spring | Early Rose (Heirloom) |
| Cabbage | Early Spring | Summer Cross |
Modern Tools: Gardening Smarter, Not Harder
2026 sees a massive rise in AI-driven gardening.
- Soil Sensors: Simple Bluetooth sensors that tell your phone when to water.
- Vigoroot Planters: Air-pruning pots that prevent plants from becoming root-bound.
Top 10 Easy Spring Gardening Hacks for Newbies in 2026
Spring 2026 marks a turning point in how we interact with our backyards. We are moving away from the “perfect lawn” and toward biodiversity, resilience, and functional beauty. Whether you are in a rainy UK suburb, a sunny US valley, or the temperate Canadian plains, these hacks are designed for the modern beginner.
1. The “Cardboard & Compost” No-Dig Method
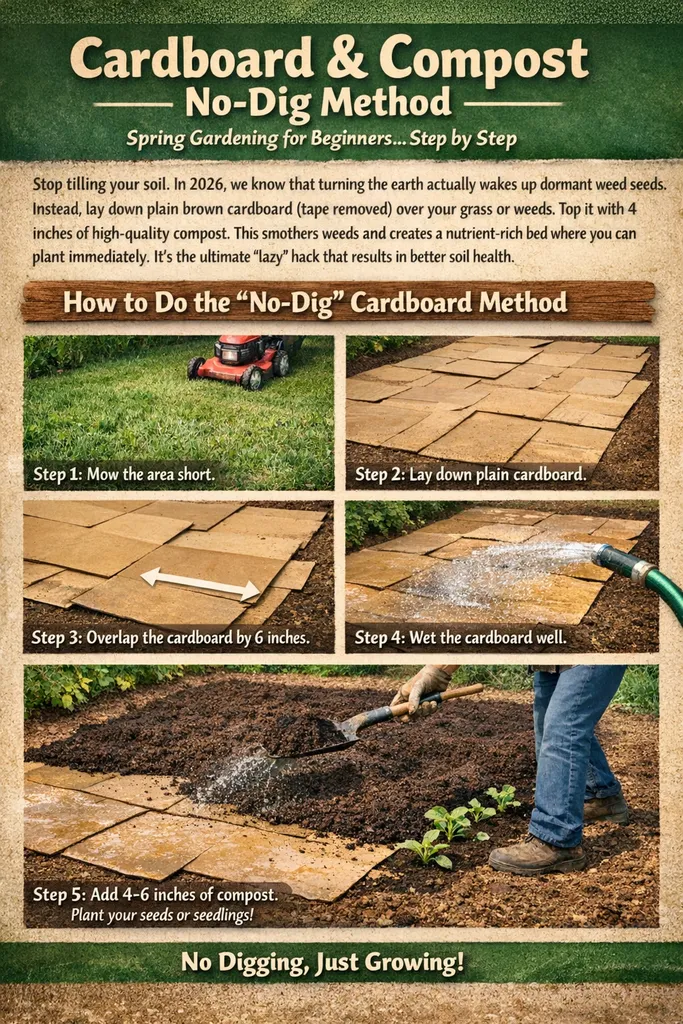
Stop tilling your soil. In 2026, we know that turning the earth actually wakes up dormant weed seeds. Instead, lay down plain brown cardboard (tape removed) over your grass or weeds. Top it with 4 inches of high-quality compost. This smothers weeds and creates a nutrient-rich bed where you can plant immediately. It’s the ultimate “lazy” hack that results in better soil health.
How to Do the “No-Dig” Cardboard Method
- Step 1: Mow the grass or weeds in your chosen area as short as possible.
- Step 2: Flatten plain brown cardboard boxes (remove all plastic tape and staples).
- Step 3: Overlap the cardboard edges by 6 inches so weeds can’t sneak through the gaps.
- Step 4: Wet the cardboard thoroughly with a hose.
- Step 5: Spread 4–6 inches of high-quality compost or garden soil directly on top. You can plant your seeds or starts into the compost immediately!
2. Upcycled Milk Jug “Cloches”
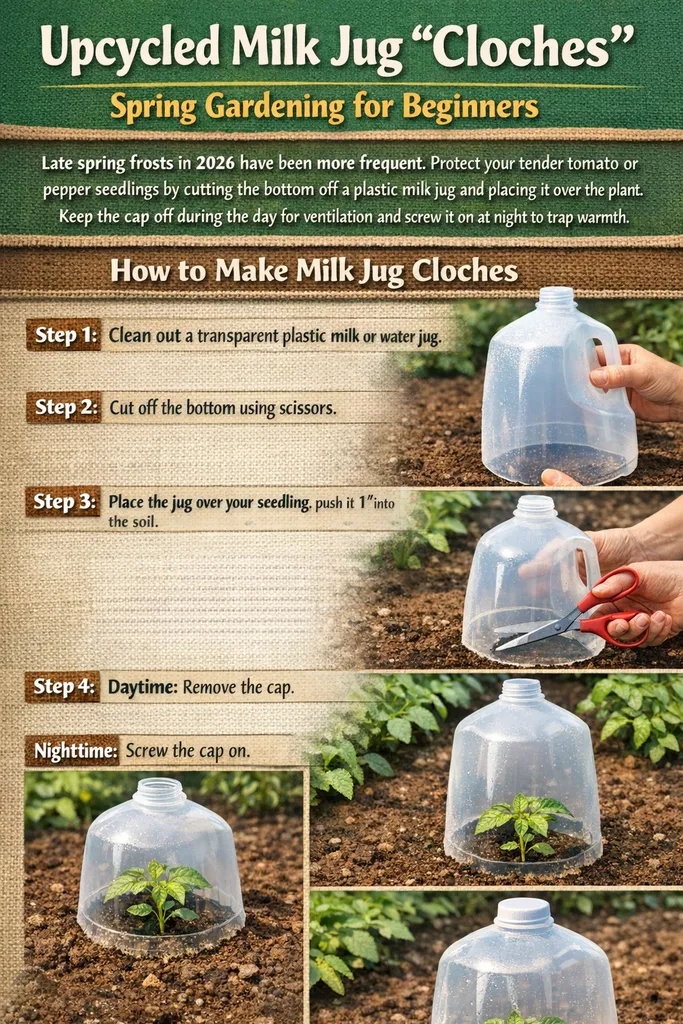
Late spring frosts in 2026 have been more frequent. Protect your tender tomato or pepper seedlings by cutting the bottom off a plastic milk jug and placing it over the plant. Keep the cap off during the day for ventilation and screw it on at night to trap warmth. It’s a free, DIY greenhouse that saves your plants from a sudden chill.
How to Make Milk Jug Cloches
- Step 1: Clean out a transparent plastic milk or water jug.
- Step 2: Use scissors to cut off the entire bottom of the jug.
- Step 3: Place the jug over your young seedling, pushing it 1 inch into the soil so it doesn’t blow away.
- Step 4: Daytime: Remove the cap so the plant doesn’t overheat. Nighttime: Screw the cap back on to trap the earth’s warmth.
3. Smart “Hydro-Zoning”
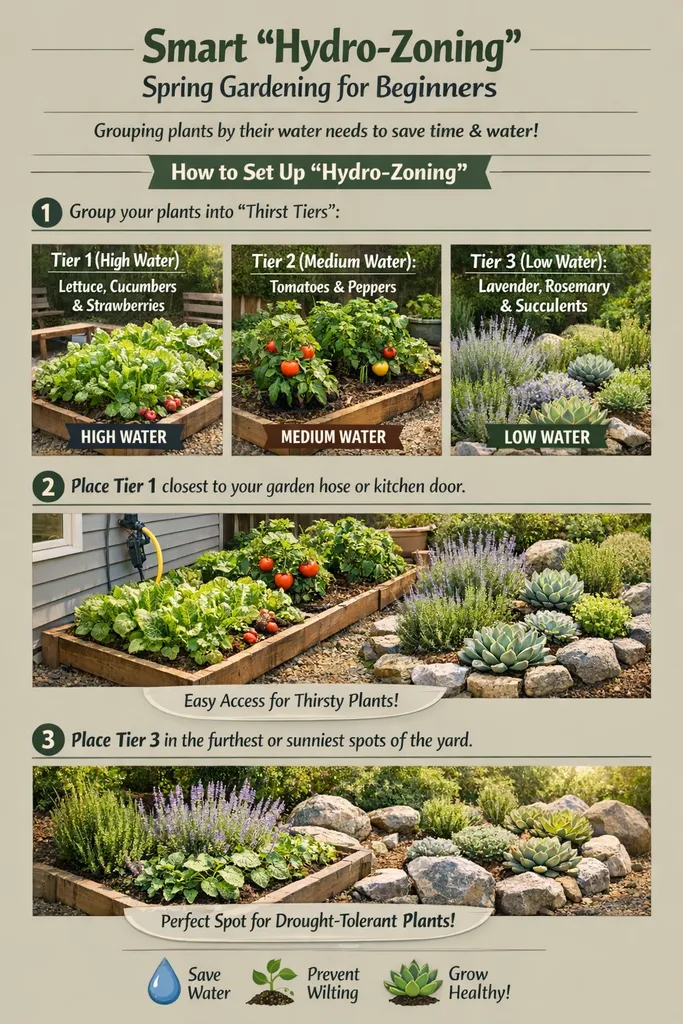
Grouping plants by their water needs—known as hydro-zoning—is a 2026 staple. Put your thirsty greens (lettuce, spinach) near your water source or in self-watering containers. Place your drought-tolerant “superstars” like lavender, rosemary, and native grasses further away. This prevents the common newbie mistake of overwatering succulents while your kale wilts.
How to Set Up “Hydro-Zoning”
- Step 1: Group your plants into “Thirst Tiers.”
- Tier 1 (High Water): Lettuce, cucumbers, and strawberries.
- Tier 2 (Medium Water): Tomatoes and peppers.
- Tier 3 (Low Water): Rosemary, Lavender, and Succulents.
- Step 2: Place Tier 1 closest to your garden hose or kitchen door.
- Step 3: Place Tier 3 in the furthest or sunniest spots of the yard.
4. The Cinnamon Seedling Shield
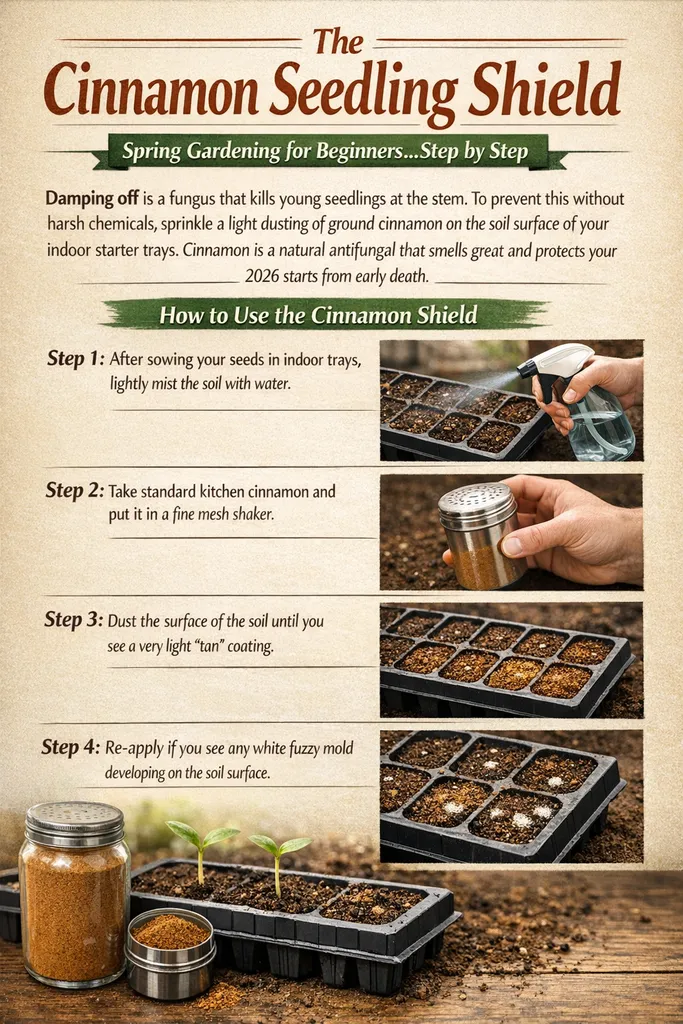
“Damping off” is a fungus that kills young seedlings at the stem. To prevent this without harsh chemicals, sprinkle a light dusting of ground cinnamon on the soil surface of your indoor starter trays. Cinnamon is a natural antifungal that smells great and protects your 2026 starts from early death.
How to Use the Cinnamon Shield
- Step 1: After sowing your seeds in indoor trays, lightly mist the soil with water.
- Step 2: Take standard kitchen cinnamon and put it in a fine mesh shaker.
- Step 3: Dust the surface of the soil until you see a very light “tan” coating.
- Step 4: Re-apply if you see any white fuzzy mold developing on the soil surface.
5. Utilize “Climate-Smart” Varieties
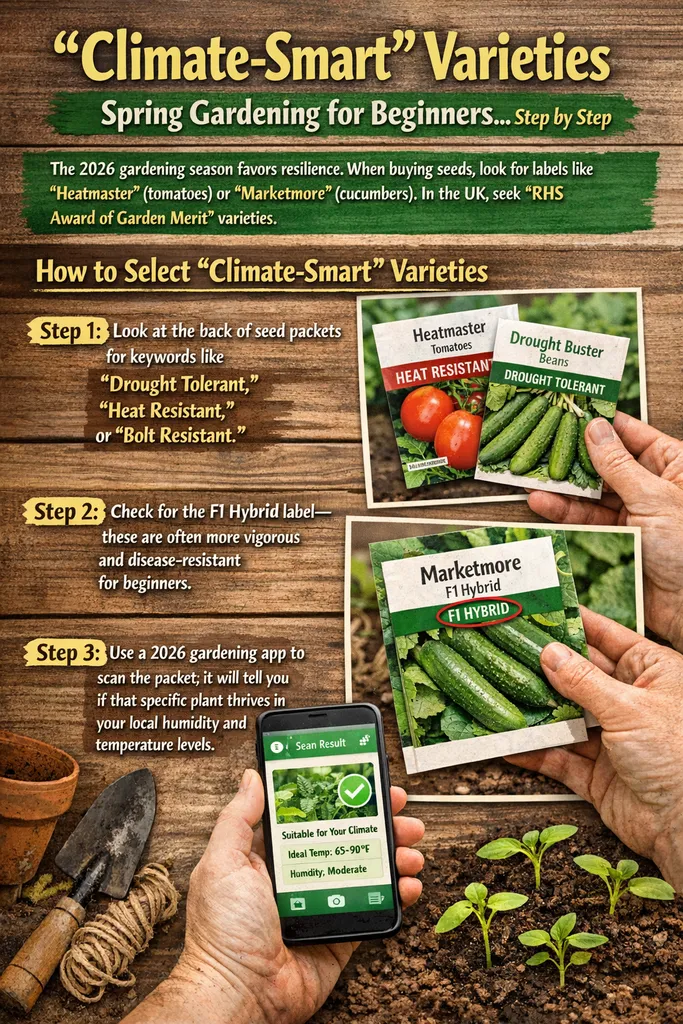
The 2026 gardening season favors resilience. When buying seeds, look for labels like “Heatmaster” (tomatoes) or “Marketmore” (cucumbers). These varieties are specifically bred to withstand the temperature fluctuations we’ve seen recently. If you’re in the UK, look for “RHS Award of Garden Merit” (AGM) varieties for guaranteed success.
How to Select “Climate-Smart” Varieties
- Step 1: Look at the back of seed packets for keywords like “Drought Tolerant,” “Heat Resistant,” or “Bolt Resistant.”
- Step 2: Check for the F1 Hybrid label—these are often more vigorous and disease-resistant for beginners.
- Step 3: Use a 2026 gardening app to scan the packet; it will tell you if that specific plant thrives in your local humidity and temperature levels.
6. Coffee Filter Pot Liners
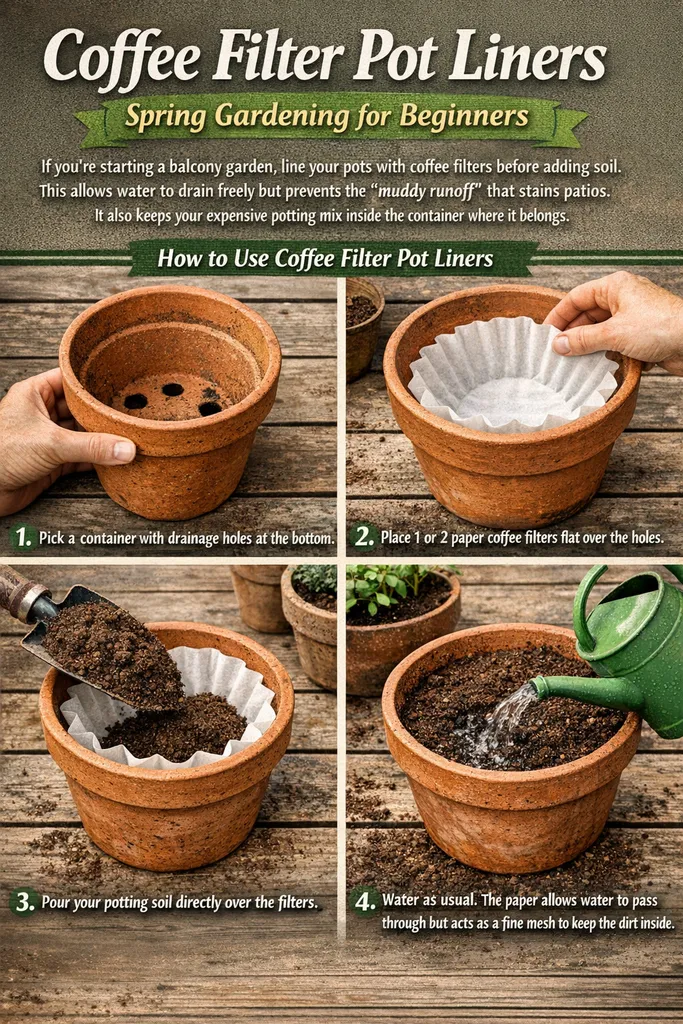
If you’re starting a balcony garden, line your pots with coffee filters before adding soil. This allows water to drain freely but prevents the “muddy runoff” that stains patios. It also keeps your expensive potting mix inside the container where it belongs.
How to Use Coffee Filter Pot Liners
- Step 1: Pick a container with drainage holes at the bottom.
- Step 2: Place 1 or 2 paper coffee filters flat over the holes.
- Step 3: Pour your potting soil directly over the filters.
- Step 4: Water as usual. The paper allows water to pass through but acts as a fine mesh to keep the dirt inside.
7. The “Finger Test” vs. AI Moisture Meters
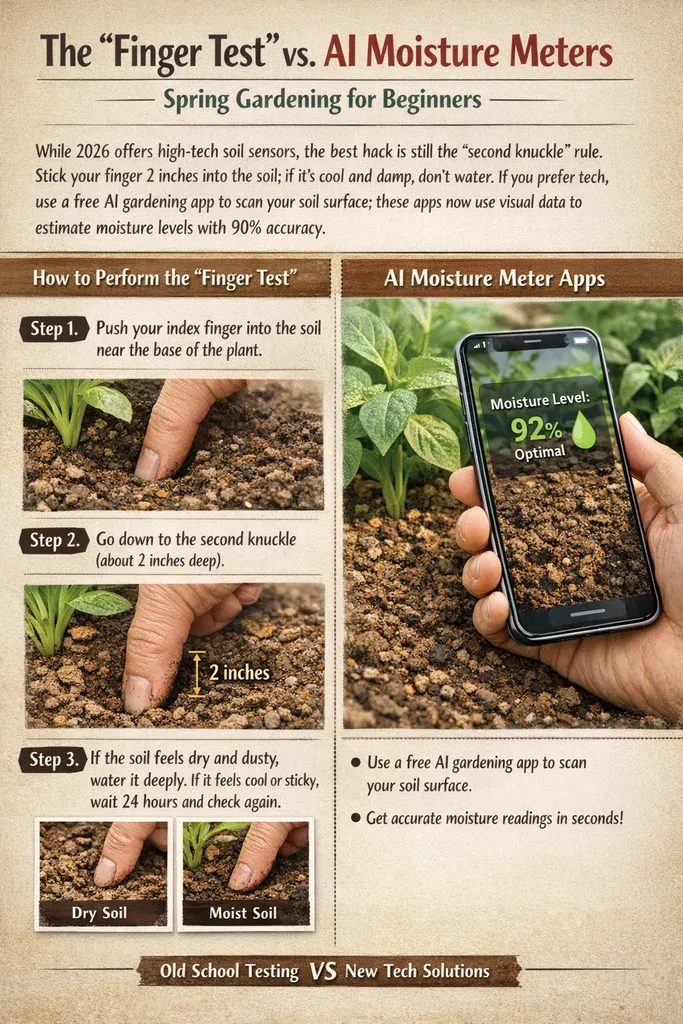
While 2026 offers high-tech soil sensors, the best hack is still the “second knuckle” rule. Stick your finger 2 inches into the soil; if it’s cool and damp, don’t water. If you prefer tech, use a free AI gardening app to scan your soil surface; these apps now use visual data to estimate moisture levels with 90% accuracy.
How to Perform the “Finger Test”
- Step 1: Push your index finger into the soil near the base of the plant.
- Step 2: Go down to the second knuckle (about 2 inches deep).
- Step 3: If the soil feels dry and dusty at your fingertip, water it deeply. If it feels cool or sticky, wait 24 hours and check again.
8. Vertical “Foodscaping” with Cattle Panels
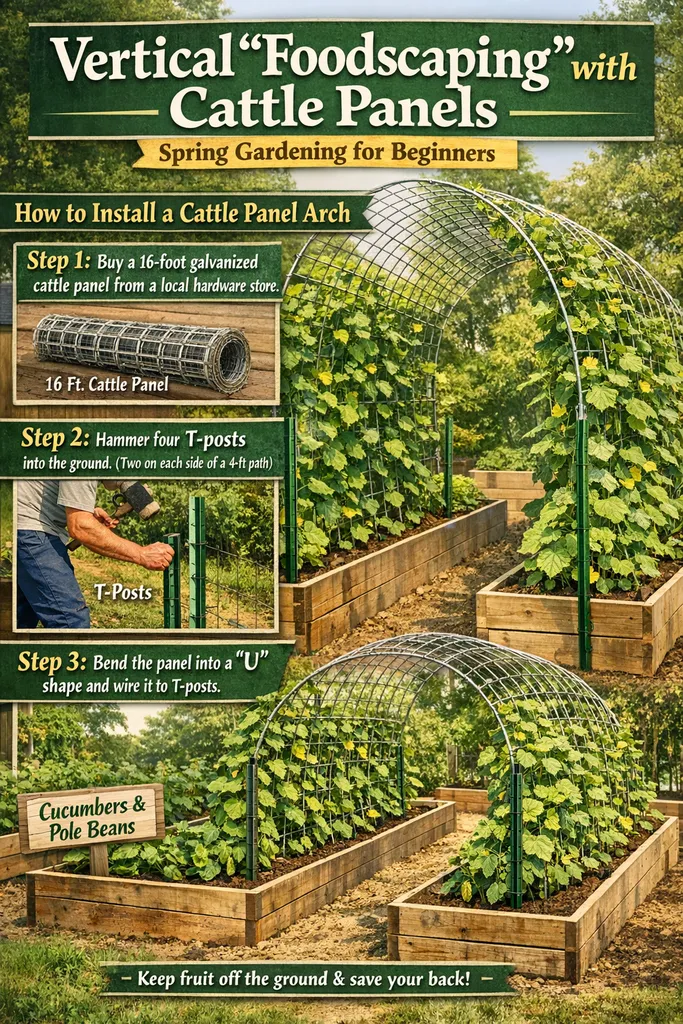
Space is at a premium in 2026. Instead of letting cucumbers and squash crawl across the ground (where they get eaten by pests), use a “Cattle Panel” arched between two raised beds. Your plants will grow upward, creating a beautiful “edible tunnel” that makes harvesting easier and saves your back.
How to Install a Cattle Panel Arch
- Step 1: Buy a 16-foot galvanized cattle panel from a local hardware store.
- Step 2: Hammer four “T-posts” into the ground (two on each side of a 4-foot path).
- Step 3: Bend the panel into a “U” shape and wire it to the T-posts.
- Step 4: Plant climbing veggies like cucumbers or pole beans at the base. They will naturally climb the wire, keeping the fruit off the ground.
9. Epsom Salt Tomato Boost

When transplanting your tomatoes this spring, drop one tablespoon of Epsom salt into the hole. The magnesium helps the plant build stronger cell walls and improves chlorophyll production, leading to a massive harvest later in the summer.
How to Give the Epsom Salt Boost
- Step 1: Dig a hole for your tomato transplant.
- Step 2: Sprinkle 1 tablespoon of Epsom salt (Magnesium Sulfate) into the bottom of the hole.
- Step 3: Cover the salt with a thin layer of dirt so the roots don’t touch it directly at first.
- Step 4: Place your tomato plant in and fill the hole. This prevents yellowing leaves and boosts fruit size.
10. The “Wild Edged” Lawn
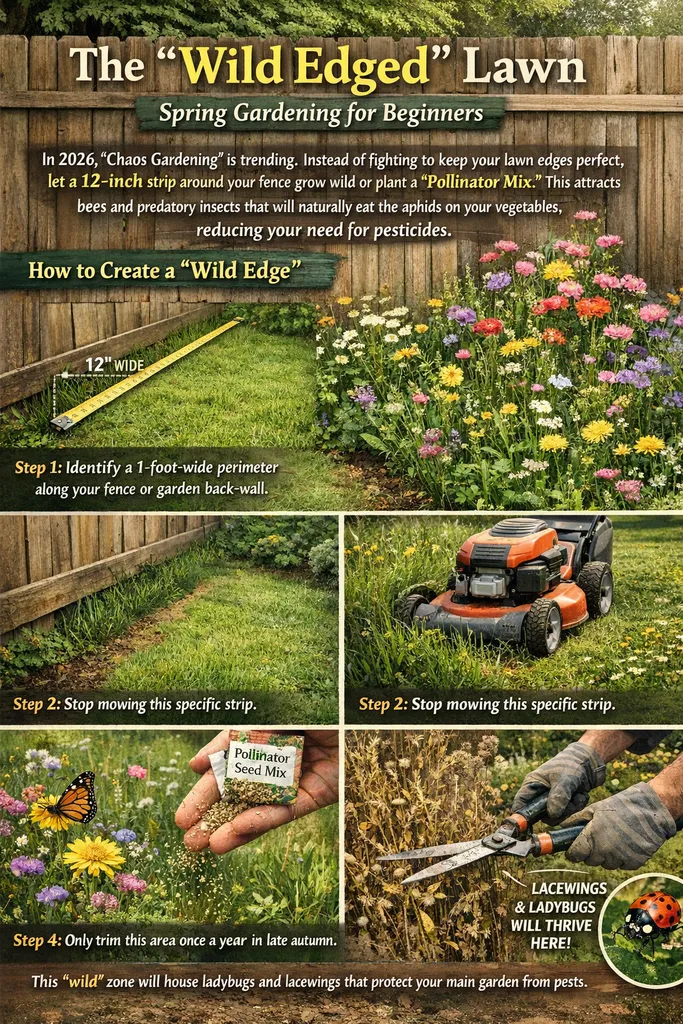
In 2026, “Chaos Gardening” is trending. Instead of fighting to keep your lawn edges perfect, let a 12-inch strip around your fence grow wild or plant a “Pollinator Mix.” This attracts bees and predatory insects that will naturally eat the aphids on your vegetables, reducing your need for pesticides.
How to Create a “Wild Edge”
- Step 1: Identify a 1-foot-wide perimeter along your fence or garden back-wall.
- Step 2: Stop mowing this specific strip.
- Step 3: Toss a “Native Pollinator Seed Mix” into the grass in early spring.
- Step 4: Only trim this area once a year in late autumn. This “wild” zone will house ladybugs and lacewings that protect your main garden from pests.
Step-by-step soil preparation for a chemical-free harvest.
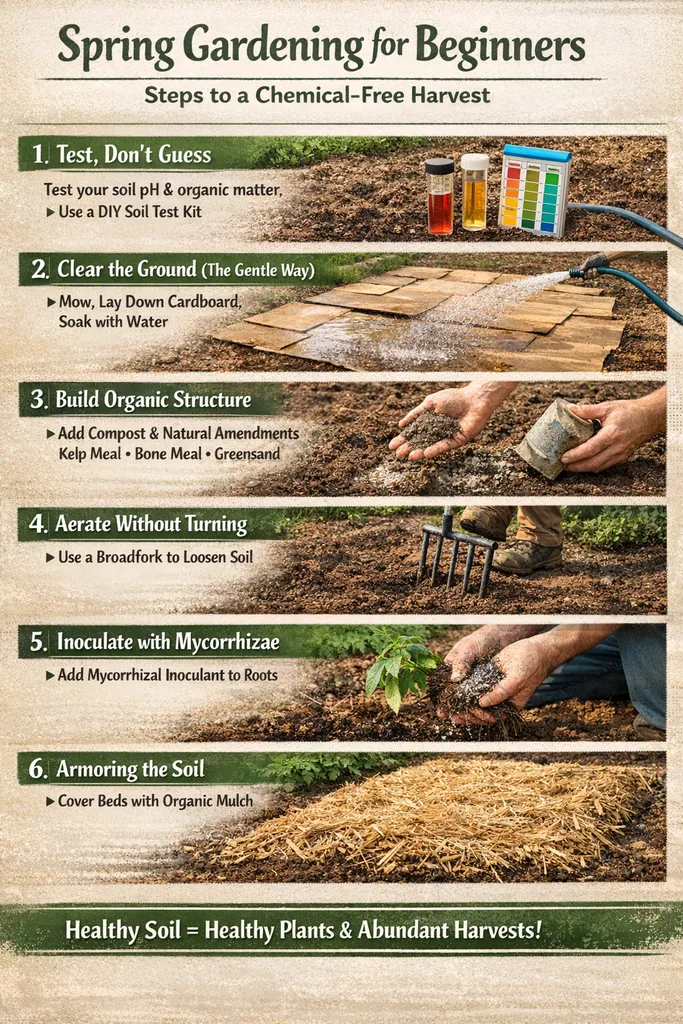
Growing for a chemical-free harvest is all about shifting your mindset from “feeding the plant” to “feeding the soil.” When your soil biology is thriving, the plants gain a natural immunity to pests and diseases, removing the need for synthetic interventions.
Here is your step-by-step guide to building a “living” soil foundation.
1. Test, Don’t Guess
Before adding anything, you need to know what you’re working with.
- Action: Buy a DIY soil test kit or send a sample to a local university extension.
- What to look for: Focus on pH levels (most veggies love 6.0 to 7.0) and organic matter percentage.
- The Goal: You want to identify deficiencies so you can fix them with natural minerals rather than “balanced” synthetic N-P-K fertilizers.
2. Clear the Ground (The Gentle Way)
Avoid heavy tilling, which destroys the delicate fungal networks (mycelium) and flips weed seeds to the surface.
- The Method: Use Sheet Mulching (Lasagna Gardening).
- Step: Mow weeds as low as possible, cover the area with plain brown cardboard (remove tape!), and soak it with water. This smothers weeds and invites earthworms to do the “tilling” for you.
3. Build Organic Structure
Now, layer your “browns” and “greens” on top of that cardboard to create nutrient-dense humus.
- The “Gold” Layer: Add 3–4 inches of high-quality, OMRI-listed compost or well-aged herbivore manure (cow, horse, or chicken).
- The Mineral Boost: If your test showed deficiencies, sprinkle in natural amendments like:
- Kelp Meal: For trace minerals.
- Bone Meal: For phosphorus.
- Greensand: For potassium.
4. Aerate Without Turning
Instead of a rototiller, use a broadfork or a pitchfork.
- Action: Push the tool into the ground and pull back slightly to crack the soil surface.
- Why: This allows oxygen and water to reach the roots without disrupting the microbial colonies that keep your plants healthy.
5. Inoculate with Mycorrhizae
Chemical-free gardening relies on a symbiotic relationship between roots and fungi.
- Action: When planting, sprinkle a mycorrhizal inoculant powder directly onto the root ball or into the planting hole.
- Benefit: These fungi act as an extended root system, helping the plant “reach” further for water and nutrients that would otherwise be inaccessible.
6. Armoring the Soil
Bare soil is stressed soil. It dries out, gets hot, and loses nutrients to erosion.
- Action: Cover your beds with 2 inches of organic mulch (straw, shredded leaves, or wood chips).
- The Payoff: This suppresses weeds, retains moisture, and eventually breaks down into more food for your soil.


Quick Comparison: Chemical vs. Biological
| Feature | Chemical Approach | Chemical-Free (Biological) |
| Nutrient Source | Synthetic Salts | Compost & Organic Matter |
| Soil Structure | Degrades over time | Improves over time |
| Pest Control | Pesticides | High plant brix (natural sugar) |
| Water Needs | High (fast evaporation) | Low (mulch retains moisture) |
Pro Tip: Start a “Compost Tea” regimen. Steeping high-quality compost in aerated water creates a liquid microbial booster you can pour directly on the soil to supercharge the ecosystem.
How to protect your sprouts from unpredictable spring frost.
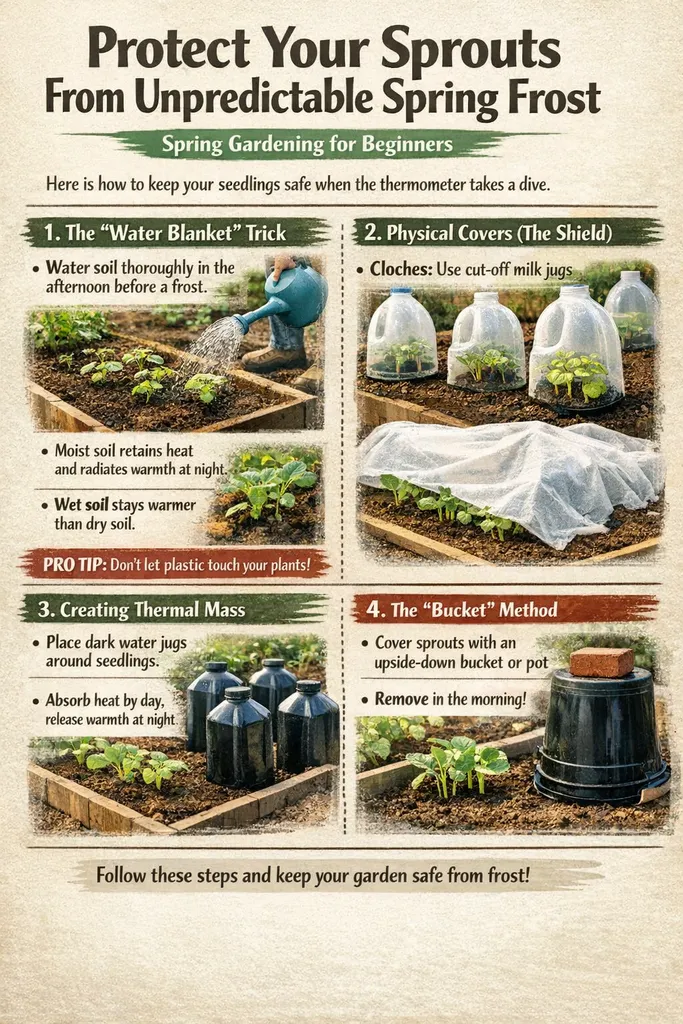
Here is how to keep your seedlings safe when the thermometer takes a dive.
1. The “Water Blanket” Trick
This sounds counterintuitive, but water your soil thoroughly in the afternoon before a frost is predicted.
- The Science: Moist soil absorbs more solar radiation during the day and radiates heat upward during the night.
- The Bonus: Wet soil stays warmer than dry, cracked soil, which can actually allow cold air to penetrate down to the root zone.
2. Physical Covers (The Shield)
You want to create a microclimate that traps the heat rising from the earth.
- Cloches: For individual plants, use a “cloche.” You can make these by cutting the bottoms off clear milk jugs or 2-liter soda bottles. Leave the cap off during the day for ventilation!
- Frost Blankets: Use dedicated “garden fabric” or old bedsheets.
- Pro Tip: Use stakes to keep the fabric from actually touching the leaves. If the fabric gets wet and freezes to the foliage, it can cause more damage than the air itself.
- Avoid Plastic: Don’t let plastic sheeting touch your plants. It transfers cold directly to the tissue and can “cook” the sprouts if you don’t remove it the second the sun comes out.
3. Creating Thermal Mass
If you have a particularly sensitive bed, you need a “battery” to store heat.
- Action: Place dark-colored jugs filled with water around your seedlings.
- How it works: The water heats up during the day and slowly releases that energy as the air temperature drops at night, keeping the immediate vicinity a few degrees warmer.
4. The “Bucket” Method
For small sprouts, a simple five-gallon bucket or a large nursery pot flipped upside down works wonders.
- Action: Place the bucket over the plant in the evening and weigh it down with a brick.
- Crucial Step: You must remove these in the morning. Even on a cool day, the greenhouse effect can overheat a sprout in a small container within an hour of direct sunlight.
Frost Tolerance Quick Guide
Know who needs the most help:
| The “Wimps” (Must Cover) | The “Tough Guys” (Can Handle Light Frost) |
| Tomatoes & Peppers | Kale & Collards |
| Squash & Cucumbers | Spinach |
| Basil | Peas |
| Beans | Radishes |
When to Unveil
The most common mistake is leaving covers on too long. As soon as the sun is up and the temperature is above freezing (usually by 9:00 AM), remove the covers. This prevents moisture buildup, which can lead to fungal diseases like “damping off.”
FAQ
- When should I start my spring garden in 2026?
- Usually 2-4 weeks after the last frost date in your specific zone.
- What are the easiest vegetables for beginners?
- Lettuce, radishes, and bush beans are virtually foolproof.
- How do I protect my garden from late spring frost?
- Use “cloches” or frost blankets (tunnels) to trap ground heat.
- Is organic gardening more expensive?
- Initially, yes, but it saves money on pesticides and fertilizers over time.
- What is “Lemonading” in gardening?
- A 2026 trend of turning garden “failures” (like poor soil) into features (like a succulent rock garden).
- Do I need a big yard to grow food?
- No, vertical planters and “Botanical Bentos” allow for high yields on balconies.
- What is the best mulch for 2026?
- Living mulches (groundcovers) or high-quality organic compost.
- How often should I water my new sprouts?
- Keep the top inch of soil moist, but never soggy.
- What are “Keystone Plants”?
- Native plants that support 90% of local wildlife (essential for 2026 biodiversity).
- Can I use AI to help my garden?
- Yes, apps now identify pests and suggest watering schedules based on local weather data.
- How do I stop pests without chemicals?
- Attract beneficial insects like ladybugs and use neem oil as a last resort.
- What is “Jewel-Toned” gardening?
- A 2026 color trend focusing on deep purples, rubies, and emeralds in both flowers and vegetables.
Final Verdict
Spring 2026 isn’t just about putting seeds in the ground; it’s about building a resilient ecosystem. By focusing on soil health, choosing climate-smart varieties, and embracing the “maximalist” beauty of mixing edibles with ornamentals, you aren’t just a beginner—you’re a steward of the land. The shift toward sustainable, tech-assisted, and joy-filled gardening makes this the perfect year to start. Don’t fear the mistakes; in 2026, we “lemonade” them into growth. Happy planting!

Leave a Reply