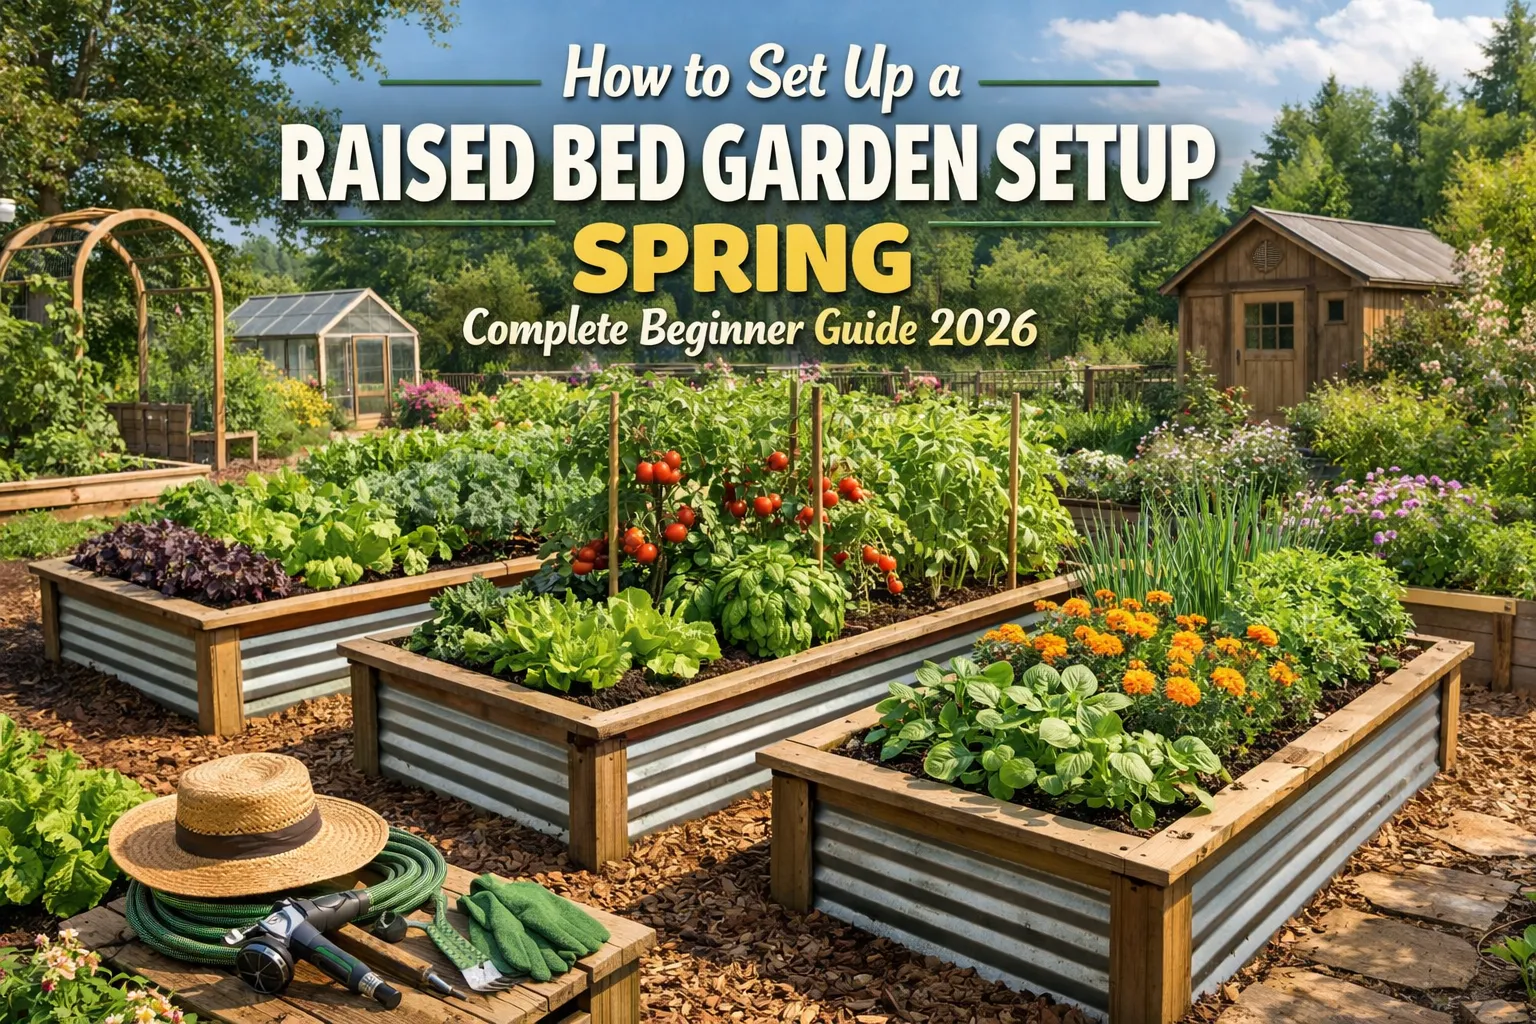
Have you ever stared out your back door longing for a few crisp leaves of lettuce to go with dinner, only to be derailed by the idea of raised bed garden setup spring? You are not alone. For many, gardening means endless rows to weed, back-breaking labor and bad native soil to fight against. But, maybe there is a better way? A technique that puts you in the driver’s seat, lightens the load on your body and lays the groundwork for your best growing season ever.
Spring is a season of renewal, which makes it the absolute best time to start your raised bed garden. Unlike in-ground plots, raised beds heat up more quickly in the spring sun, so you can plant them earlier and push your harvest. They promise generous flowers and vegetables without the guesswork, transforming areas of poor soil into oases of fertility. No matter if your patch of dirt is a sprawling suburban lot in Ohio, a small city garden in London or a rocky backyard in British Columbia, raised beds are the great equalizer for gardeners.
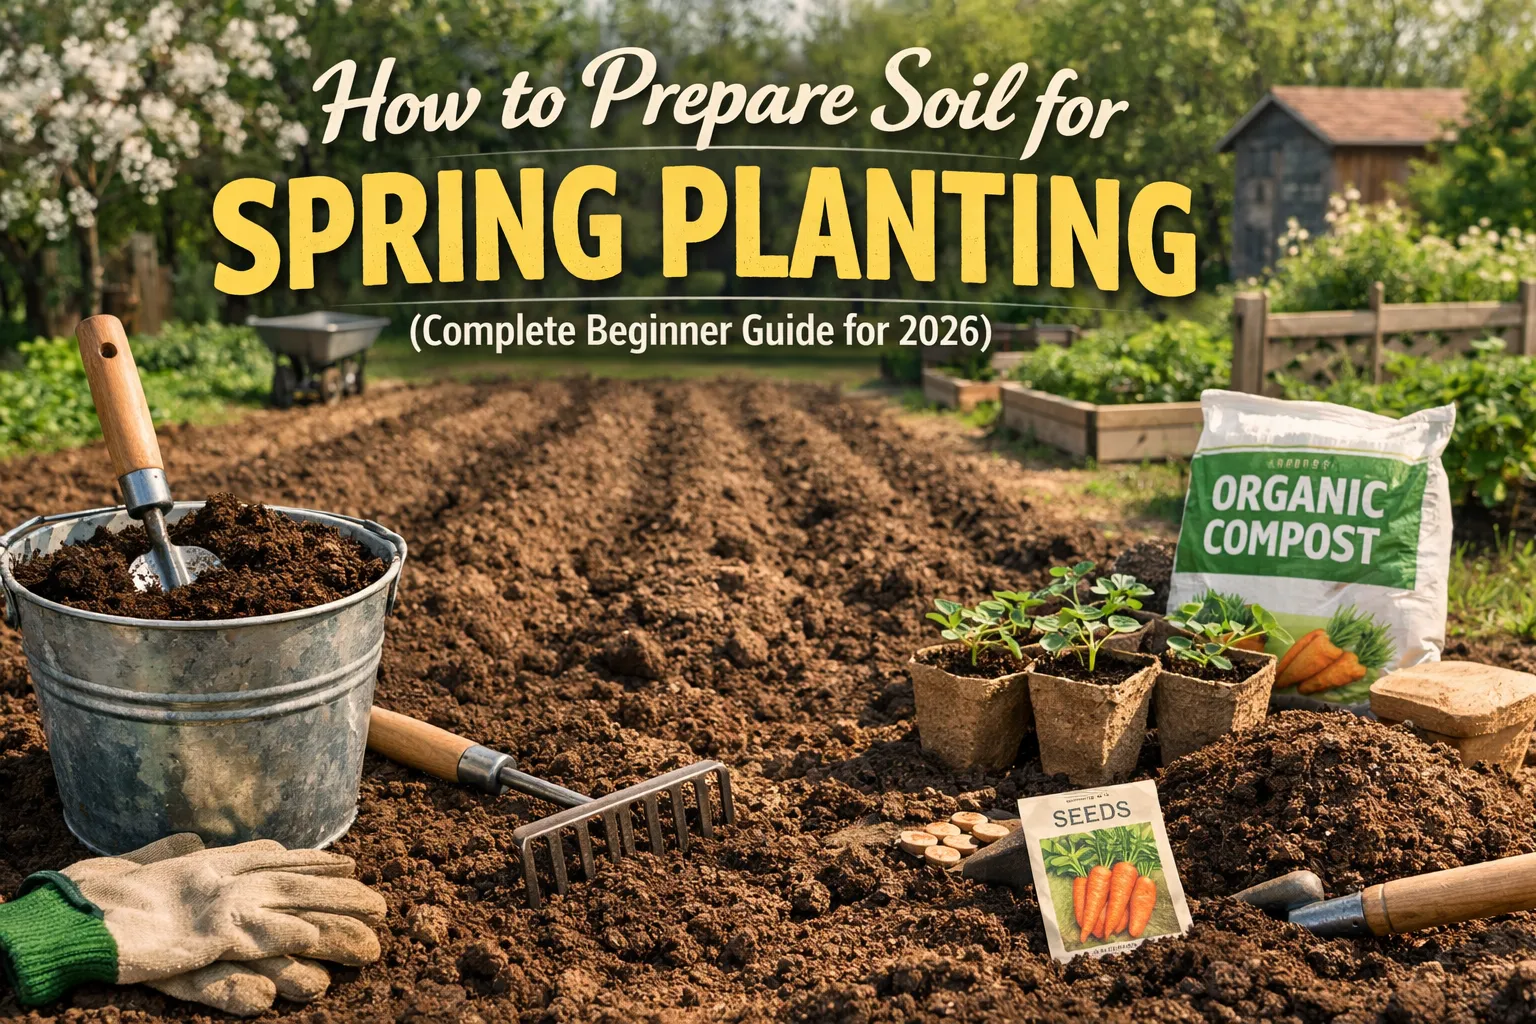
What You Should Know to Grow a Garden of Raised Beds: A Complete Guide For 2026 What you need to know about how to successfully go from an empty space, through planning and planting, to acres of flourishing raised bed garden. We’ll tackle choosing the ideal location, constructing or purchasing the proper bed, making “Goldilocks” soil (not too thick and not too sandy, but just perfect) and growing the best crops for spring success. We also pack in expert-approved layouts, companion planting strategies and solutions to common beginner blunders. You will have everything you need to be able to create a raised bed garden that is the envy of the neighborhood by the time you reach the end!
Why Choose a Raised Bed Garden? (The Benefits)
Before we get into the how, let’s take a look at the why. The raised bed garden is not a fad, but rather a practical answer that addresses many of the most common problems new gardeners encounter.
- Superior Soil Control: If your yard is packed with dense clay or rapidly draining sand, a raised bed lets you completely skirt it. You fill the bed with just the right mix of soil, setting your plants up for a healthy root formation.
- Better Drainage: Raised beds remove the danger of roots sitting in water. The high rise characteristic sama runs off extra water effortlessly are critical for good growing up plants.
- Extended Growing Season: Being above ground level, their soil is exposed to more air and sun, warming it faster in the spring. This means you can start early on your cool-season crops.
- Accessibility and Comfort: And filling your beds with fresh soil and incorporating items like cardboard as a barrier on bottom stiffs up enough grass from coming back. Well defined borders also allow for the use of pest barriers such as row cover or netting.
- Fewer Weeds and Pests: Filling your beds with clean soil and using things like cardboard as a barrier at the very bottom prevents a good amount of grass from coming up. Clearly defined borders also facilitate pest barriers like row covers or netting.
step by step planning Your Spring Raised Bed instruction
Step 1: Planning Your Spring Raised Bed Setup
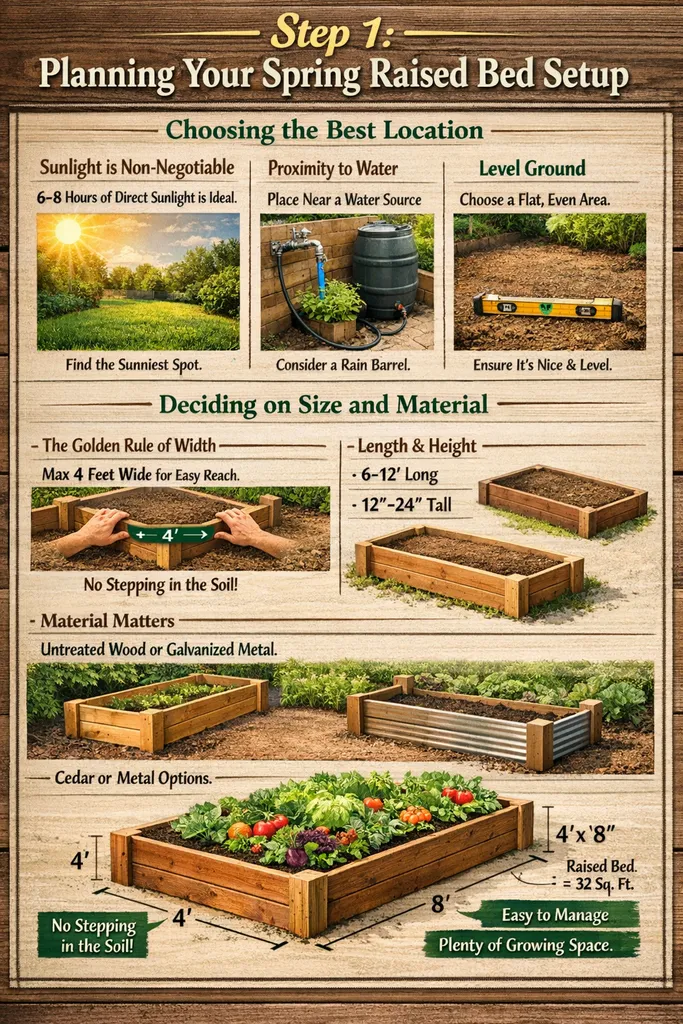
Choosing the Best Location
The success of your garden starts with location. Before you buy a single board or bag of soil, observe your yard.
- Sunlight is Non-Negotiable: Most vegetables and flowering annuals need 6 to 8 hours of direct sunlight daily . Spend a couple of days following the sun around your yard to identify the sunniest spot. If you have some shade, don’t fret; you can still grow leafy greens there, such as lettuce and spinach, but fruiting plants like tomatoes will be a struggle.
- Proximity to Water: The worst thing of all is dragging a heavy staff every day all over the yard. Position your beds near a water source for easy but regular irrigation. Install a rain barrel around for an eco-friendly alternative.
- Level Ground: Ensure the spot is relatively flat. This makes construction easier and prevents the bed frame from warping or twisting over time.
Deciding on Size and Material
The size of your bed determines how easy it is to maintain.
- The Golden Rule of Width: The sides of the bed should be far enough for you to comfortably reach that center without stepping in soil. Walking on the soil compacts it, destroying the loose texture you work so hard to form. As a result, the maximum width for a double-sided accessible bed is 4 feet. If your bed will be up against a fence (open on one side), limit it to 2.5 to 3 feet wide.
- Length and Height: Length can be as long as your space allows (6, 8, or 12 feet). Height is flexible. A height of 6 to 12 inches is sufficient for most crops, but if you have poor native soil (like solid clay) or mobility issues, opt for beds that are 12 to 24 inches tall .
- Material Matters: Untreated lumber (such as cedar or redwood, which rot-resistant by nature) is a common option. Do not use old railroad ties or treated timber from before 2004, as it may contain harmful chemicals. They also do very well with heat retention and durability metal beds (galvanized steel)
The 4×8 Layout: A Beginner’s Best Friend
4×8 foot Raised Bed (The Gold Standard For Noobs) It offers 32 square feet of growing space — large enough to produce a lot of food, small enough to easily manage. You can access the middle from the 4-foot sides and the 8-foot length gives rows (or creative patterns) plenty of room.
Step 2: Soil Preparation – The Secret to Success
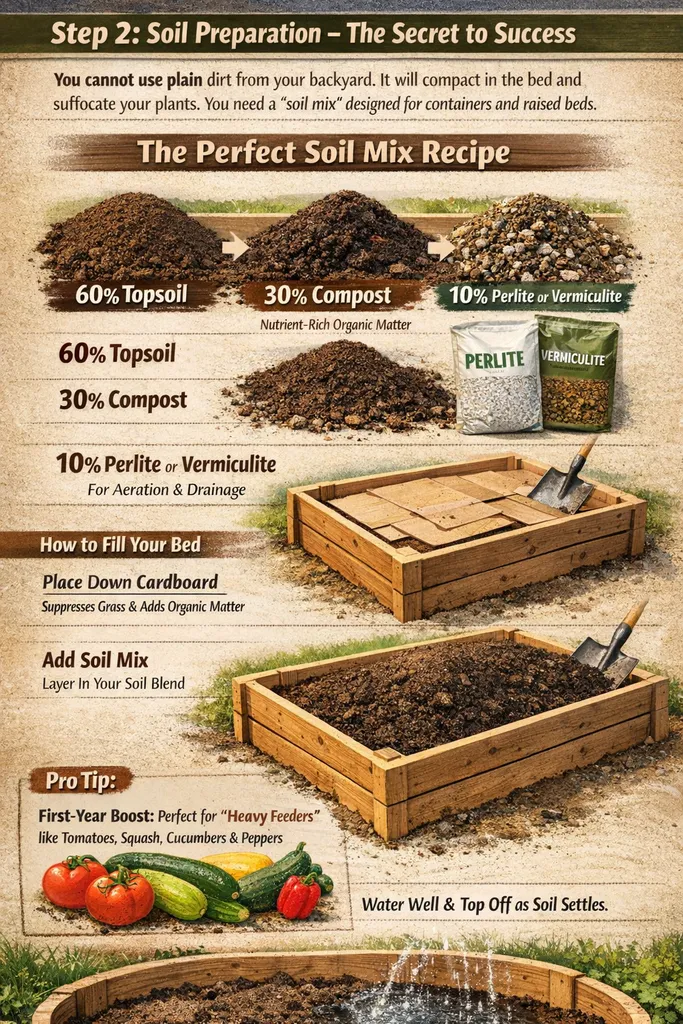
You cannot use plain dirt from your backyard. It will compact in the bed and suffocate your plants. You need a “soil mix” designed for containers and raised beds.
The Perfect Soil Mix Recipe
Aim for a blend that holds moisture but drains well. A standard recipe is the 60/30/10 mix:
- 60% Topsoil: This provides the bulk and mineral content. Purchase a screened topsoil from a local landscape supply store.
- 30% Compost: This is the nutrient powerhouse. Use quality organic compost, mushroom compost, or well-rotted manure. It feeds your plants and helps retain moisture .
- 10% Aeration (Perlite or Vermiculite): This is the magic ingredient that keeps the soil light and fluffy, allowing roots to penetrate easily and water to drain .
Pro Tip: In the first year, your raised bed is packed with nutrients due to the fresh compost. This is the perfect time to grow “heavy feeders”—plants that require lots of nitrogen—such as tomatoes, squash, cucumbers, and peppers .
How to Fill Your Bed
If you’re constructing the bed over a grassy area, one great trick is to simply put down thick cardboard directly on the grass before filling the bed. This cardboard will cover the grass and it eventually get composted in your bed and also increase the amount of organic matter as well as earth worm farming. Use your soil mix to fill the bed, water deeply to settle it, and top off with more mix as it will sink.
Step 3: Best Vegetables to Plant in Spring (Cool-Season Crops)
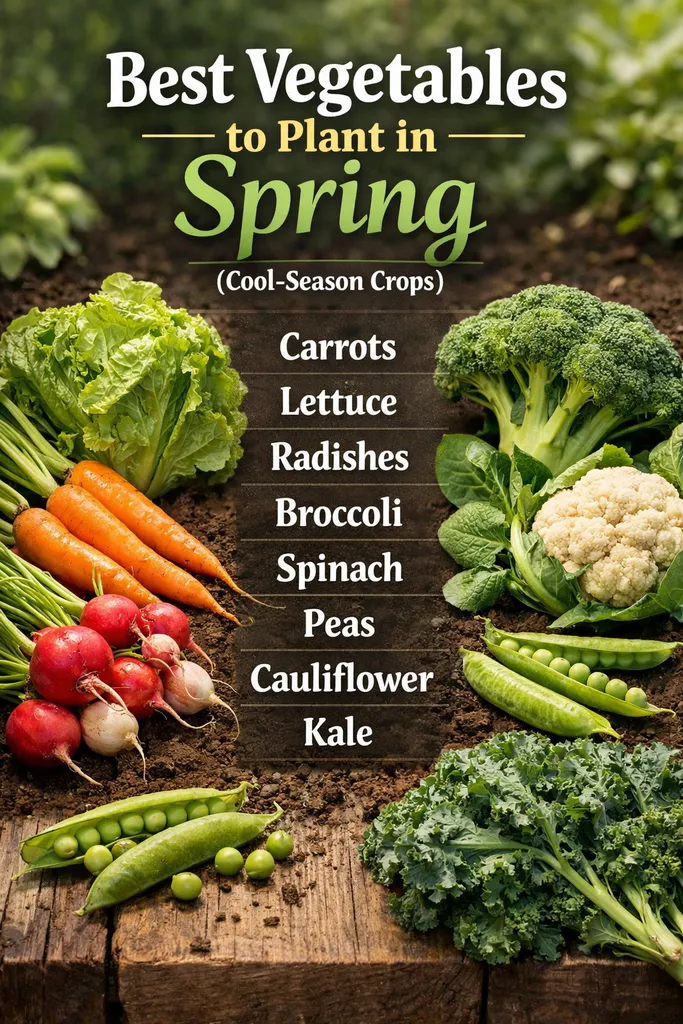
Spring weather is mercurial — warm one day, cool the next. You need pretty tncber plants to meet it. They are referred to as cool-season crops. They flourish in the temperate spring climate and often withstand a light frost.
Top 10 Spring Vegetables for Raised Beds
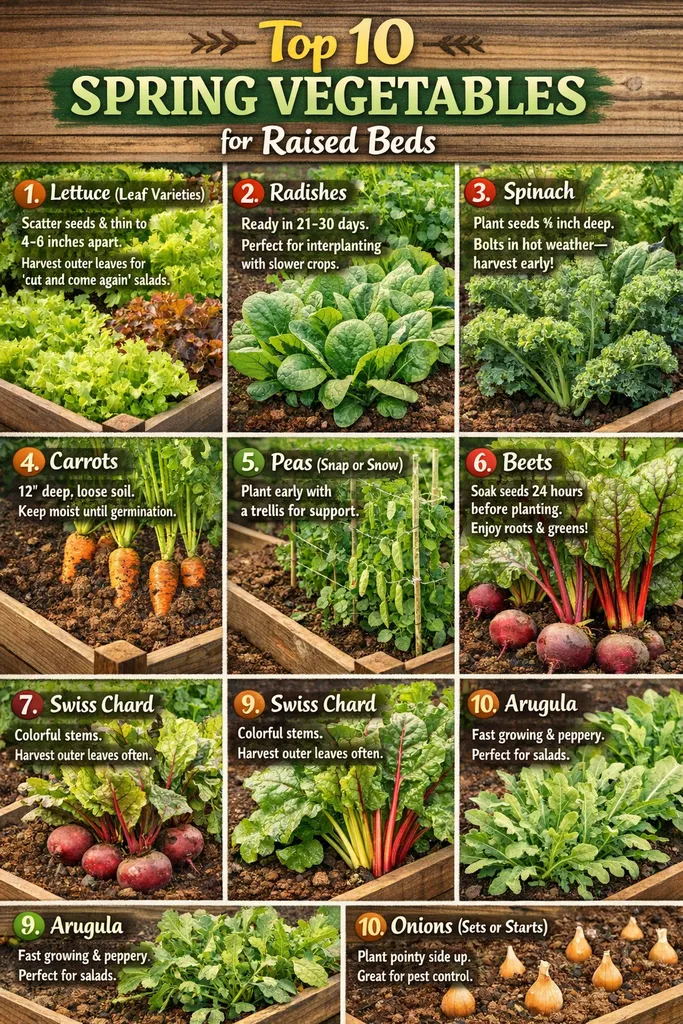
- Lettuce (Leaf varieties):
- Radishes: The fastest vegetable you can grow. Ready in as little as 21-30 days . Perfect for interplanting with slower crops.
- Spinach: Loves cool weather. Plant seeds ½ inch deep. Once the weather gets too hot, it will “bolt” (go to seed), so enjoy it while it lasts .
- Kale: A superfood that is incredibly hardy. It can survive frosts and even tastes sweeter after a cold snap .
- Carrots: Need deep, loose soil (at least 12 inches). Sow seeds shallowly and keep the soil moist until they germinate .
- Peas (Snap or Snow): Plant them as early as St. Patrick’s Day in many regions. They need a trellis for support, even in a raised bed .
- Beets: You get two crops in one—the roots and the nutritious greens. Soak seeds for 24 hours before planting to speed up germination .
- Swiss Chard: A stunning plant with colorful stems. Harvest the outer leaves, and it will keep producing from the center all season .
- Arugula: A peppery green that grows very quickly. Great for adding zest to salads .
- Onions (Sets or Starts): Plant the small bulbs (sets) pointy side up. They help deter pests from other plants .
Spring Planting Chart
Step 4: Designing Your Spring Layout
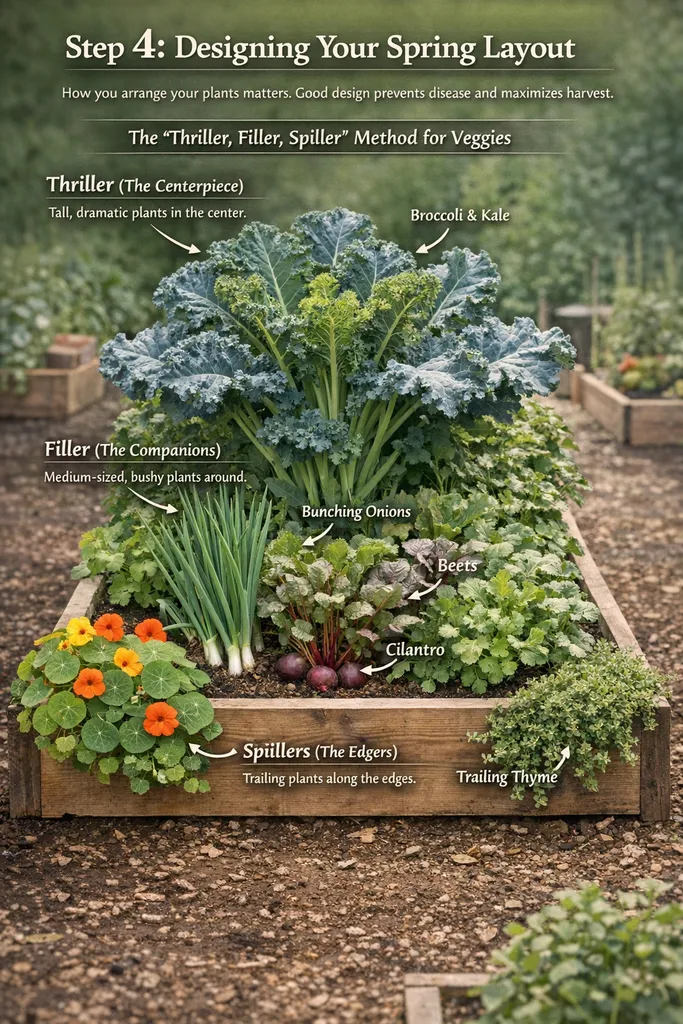
How you arrange your plants matters. Good design prevents disease and maximizes harvest.
The “Thriller, Filler, Spiller” Method for Veggies
Borrow a concept from container gardening and apply it to your raised bed:
- Thriller (The Centerpiece): In the center of the bed, plant tall, dramatic plants that will dominate the space. In spring, this could be broccoli or kale that you intend to let grow large.
- Filler (The Companions): Surround the thriller with medium-sized, bushy plants. This includes things like bunching onions, beets, or cilantro.
- Spiller (The Edgers): Plant along the edges so they can cascade over the sides. Nasturtiums (which are edible) are perfect for this, or trailing thyme .
Companion Planting Strategies

Companion planting is the art of pairing plants that help each other.
- Tomatoes & Basil: Although tomatoes are sowed in late spring, in warmer areas plant basil next to them. It is claimed to enhance the flavor of tomatoes and deter flies and mosquitoes.
- Carrots & Onions: The smell of onions deters carrot root flies, protecting your carrot crop .
- Marigolds & Everything: French marigolds are the workhorses of the garden. Plant them throughout your bed to deter nematodes and other pests .
- Nasturtiums & Cucumbers: Nasturtiums act as a “trap crop,” luring aphids away from your valuable cucumber plants .
Step 5: Essential Spring Maintenance Tips
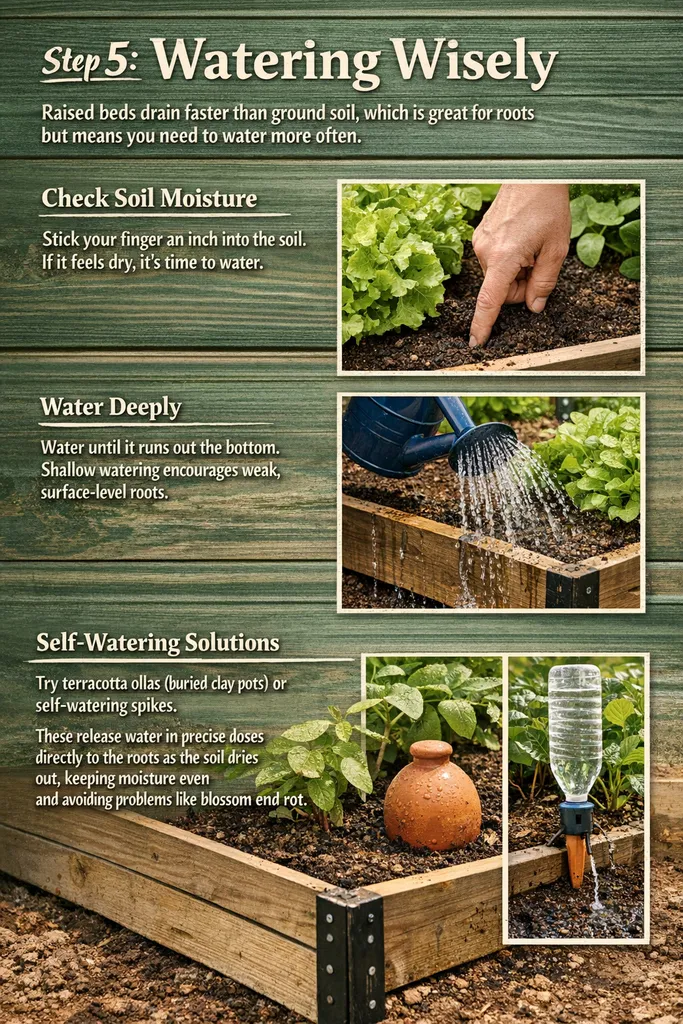
Watering Wisely
Raised beds drain faster than ground soil, which is great for roots but means you need to water more often.
- Check Soil Moisture: Stick your finger an inch into the soil. If it feels dry, it’s time to water.
- Water Deeply: Water until it runs out the bottom. Shallow watering encourages weak, surface-level roots.
- Self-Watering Solutions: To fend off unpredictable spring weather, try terracotta ollas (buried clay pots) or self-watering spikes. These release water in precise doses directly to the roots as the soil dries out, keeping moisture even and avoiding problems such as blossom end rot later in the season.
Frost Protection
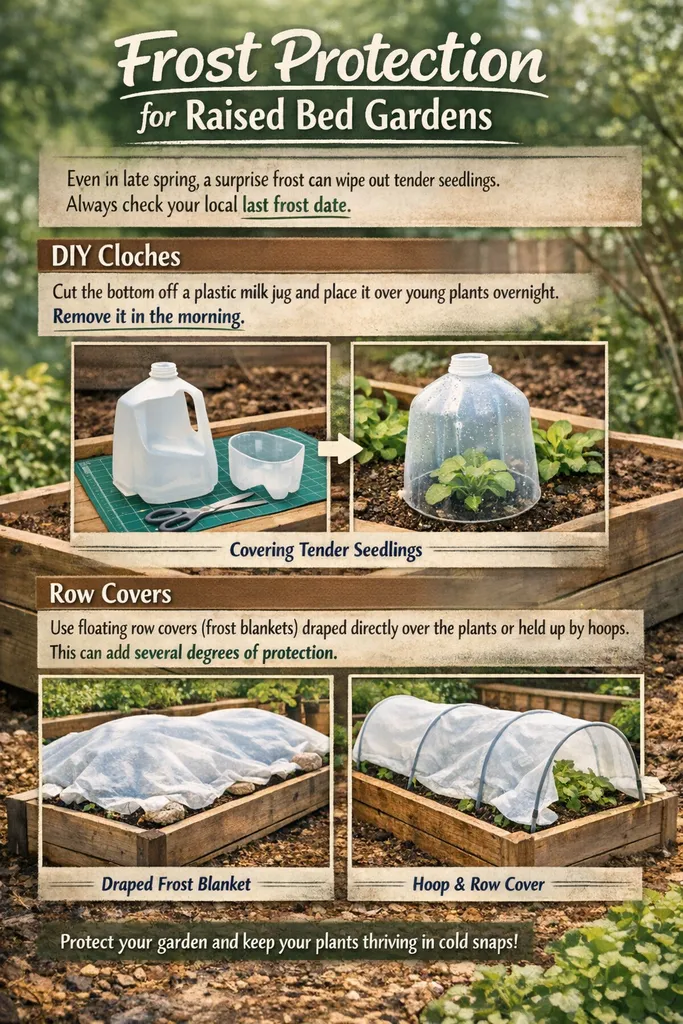
Even in late spring, a surprise frost can wipe out tender seedlings. Always check your local last frost date.
- DIY Cloches: Cut the bottom off a plastic milk jug and place it over young plants overnight. Remove it in the morning.
- Row Covers: Use floating row covers (frost blankets) draped directly over the plants or held up by hoops. This can add several degrees of protection .
Mulching
When your seedlings are a couple of inches high, cover them with a layer of straw, shredded leaves or sugar cane mulch (yes that’s real mulch) around them (though do not allow it to contact the stems). Mulch helps retain moisture, moderates soil temperature and suppresses weeds.
Succession Planting
Don’t let space go to waste. Harvest your radishes (which take 3 weeks to mature) and plant some other vegetable in that spot, like a bush bean, or more lettuce. It guarantees steady harvests rather than one massive glut of food .
Conclusion
One of the best projects you can do this spring is set up a raised bed garden. It puts you in the driver’s seat, enabling you to take charge of the soil, the design and the well-being of your plants from day one. By selecting a sunny spot, amending your bed with a light, nutrient-dense soil mix and sowing a variety of cool-season crops such as lettuce, peas and radishes, you’re setting the stage for a summer harvest — enough to share.
Just a reminder, every pro was once an amateur. Your first year is an education. So some plants will thrive and some might struggle — that’s totally fine. The trick is to experiment, tweak and have fun! Nothing beats the flavor of a sun-warmed tomato or a fresh snap pea picked in your back yard, and it all begins with one simple thing: planting yourself a bed this spring. So grab your tools, choose your location and prepare to find the grow!
FAQ
1. How deep should my raised bed be for vegetables?
For most vegetables, including lettuce, herbs and peppers, 12 inches is enough. For deep-rooted crops such as carrots, potatoes or tomatoes, 12 to 18 inches is ideal to give roots room to spread out .
2. What is the best wood to use for a raised bed?
Untreated cedar and redwood are the gold standard, as they’re naturally rot-resistant and may last 10 to 15 years without being treated with chemicals. If you are using treated lumber, make sure it is the new ACQ (Alkaline Copper Quaternary) treated wood and is safe for edible gardens.
3. Can I fill the bottom of my raised bed with rocks or sticks to save soil?
Better to skip a “drainage layer” of rocks at the bottom. That can form a “perched water table” that literally holds the water against your soil. Instead, cover the ground directly inside the bed with cardboard to kill grass, and fill the whole bed with your soil mix. You can fill the bottom ⅓ with big logs/sticks if you are cost-saving (this technique is called Hügelkultur) but that must be covered by some soil.
4. Should I put a liner at the bottom of my raised bed?
Not to drain, but yes to keep weeds and pests out. A piece of cardboard or a few sheets of newspaper are ideal. It prevents grass and weeds from growing up into your bed, but it eventually breaks down, allowing worms to move through in order to enrich your soil.
5. When should I plant tomatoes in my raised bed?
Tomatoes are warm-season crops. They will not do well until after the danger of frost has passed and soil temperatures have warmed up. This is usually mid to late May, or even early June in most of the US and UK. Planting them too soon, in a cold soil, will delay their growth.
6. How often should I water my raised bed?
It varies depending on your climate and wind exposure, but in general 1-2 times a week with deep watered is a good guideline. You might need to water more often during hot, dry or windy spring weather. Always test for soil moisture first.
7. Can I use garden soil from my yard in a raised bed?
It is not recommended. Garden soil is overly compacted and heavy. It will pack into the limited space available in a raised bed, choking out plant roots. You require a lighter soil mix that includes aeration materials such as perlite or vermiculite.
8. What are the easiest vegetables to grow for a first-timer?
Lettuce, radishes, green beans, kale, and peas are the easiest. They germinate quickly and are very forgiving for beginner gardeners .
9. Do I need to fertilize a brand-new raised bed?
If you used a good mix of topsoil and compost in the first year, you probably don’t want more fertilizer. The compost has lots of nutrients. In later years you will have to top dress with compost or apply an organic fertilizer to make up for what was used by the plants.
10. How do I keep weeds out of my raised bed?
Start with weed-free soil. If you spot weeds, pull them when they are small. Mulch (such as straw) to smother weeds Applying a thick layer of mulch around your plants will keep sunlight from reaching weed seeds, stopping them not only from sprouting
11. What should I plant after I harvest my spring crops?
This is called succession planting. After harvesting cool-season blocks, like peas and lettuce, in early summer, plant warm-season ones, such as bush beans, cucumbers or summer squash there for a fall harvest..
12. Can I grow herbs in the same bed as vegetables?
Absolutely! Herbs are great companion plants for many reasons. Basil does well with tomatoes, dill draws helpful predators and chives deter pests. Adding herbs such as rosemary, thyme and sage around the edges of your bed not only looks beautiful, but they also serve a function.
Final Verdict
But the hardest part, getting started on your plot in the spring of 2026, is not a weekend project — it’s an investment you make now toward better health, better food and greater peace of mind. There’s no failing: get a sunny spot, dry-foot a bed of no more than 4 feet across, pour in a top-of-the-line blend of topsoil and compost, fill it up with tough-as-nails cool-season crops.
What is beautiful about this system, however, is how simple and controllable it is. Your native dirt is no longer holding you hostage.” You are an artist creating a curated place where plants can thrive. If you follow the guidance in this guide—including the 4×8 layout that minimizes accessibility problems with huge beds, and the strategic placement of plants intended to support each other—you’re avoiding all the cliches that drive beginners away from gardening.
In 2026, take on raised bed gardening as not only a new hobby but as permanent sustainable lifestyle change. Set small goals, reward your successes (even the teeny carrots!), and grow from the adversities. The smell of damp spring dirt, and that first bite of a sun-warmed snap pea from your own back yard makes all the work worthwhile.

Leave a Reply