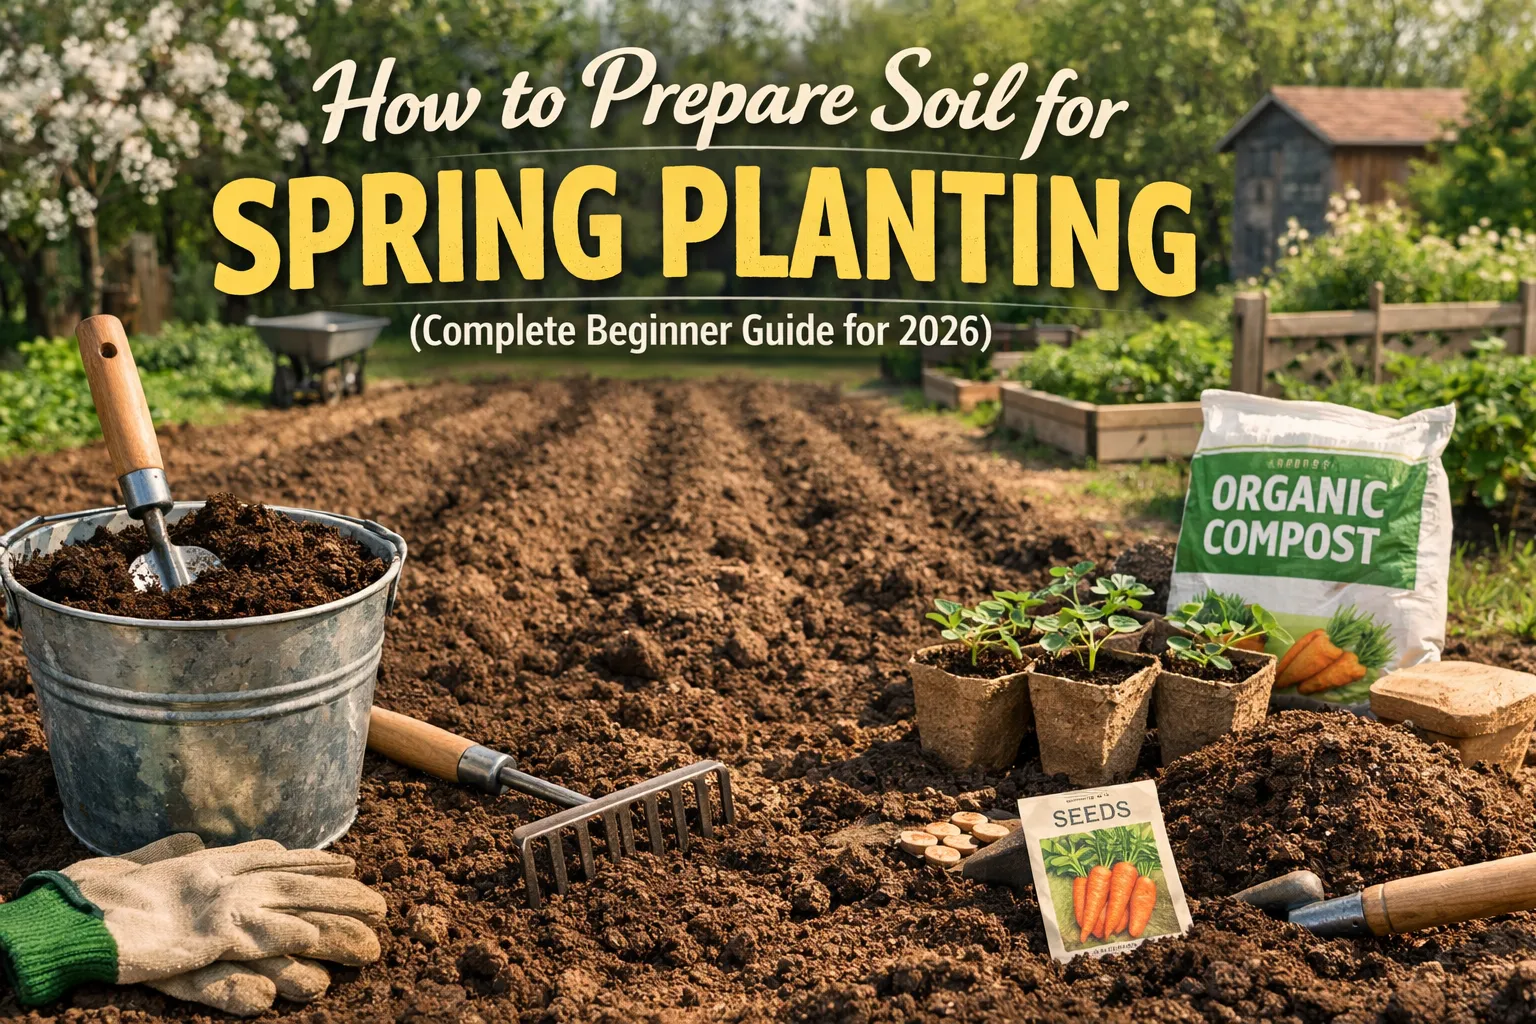
Every thriving garden starts below ground — in the soil. If you’re going to be growing vegetables, flowers or fruit this upcoming season, learning how to prepare soil for spring planting is among the most critical steps you can take.
Because so many new gardeners misjudge when to plant seeds, they rush into sowing once the weather warms up. Unfortunately, poorly prepared soil often results in weak plants, slow-growing crops, and disappointing harvests. Nutrient-poor, poorly drained or compacted soil can inhibit root development. No high quality seed or plant can grow well in unhealthy soil.
The good news: Preparing soil for spring planting is not rocket science. A few basic techniques — soil testing, composting, loosening compacted soil and balancing nutrients — can turn most garden beds into fertile ground ready for growing.
Whether you’re planting vegetables, flowers, herbs or fruit trees, proper soil preparation will give plants the nutrients, moisture and oxygen they need to thrive throughout the growing season.
This getting started guide will take you step by step through everything you need to know for prepping garden soil in spring 2026. From understanding soil structure to incorporating organic matter and amending for drainage, you’ll learn the precise steps that expert gardeners take to re-create rich, healthy earth season after season.
Why Soil Preparation is Non-Negotiable in 2026
Soil — think of it as not dirt, but a living, breathing ecosystem. Just one teaspoon of healthy garden soil contains more microorganisms than there are people on Earth. This underground universe — bacteria, fungi, earthworms and innumerable other organisms — is what delivers nutrients to your plants, fights off the bad stuff that can make them sick and builds the structure that allows roots to breathe.
By amending it and prepping it properly in the spring, you are actually waking this ecosystem up calmly and giving it a food source and a home so that it can assist your plants. “Spring garden prep is like laying the foundation for your house — if you do it right, everything will fall into place,” says gardening expert Ryan McEnaney. By following the steps in this guide, you aren’t simply planting a garden; you’re creating a thriving underground society that will pay dividends with vigorous growth, increased yields and less trouble from pests all summer long.
Top 5 Organic Soil Secrets: How to Prep Your Garden for Spring
Spring is the gardener’s “opening night,” and your soil is the stage. If the soil is not prepared, the performance will bomb—no matter how much you water or weed.
Forget the synthetic quick-fixes. If you want a garden that runs on autopilot, you need to play nice with the biology already beneath your feet. These are the top 5 organic secrets to prepping your soil this spring.
1. The “No-Till” Rule (Keep the House Intact)
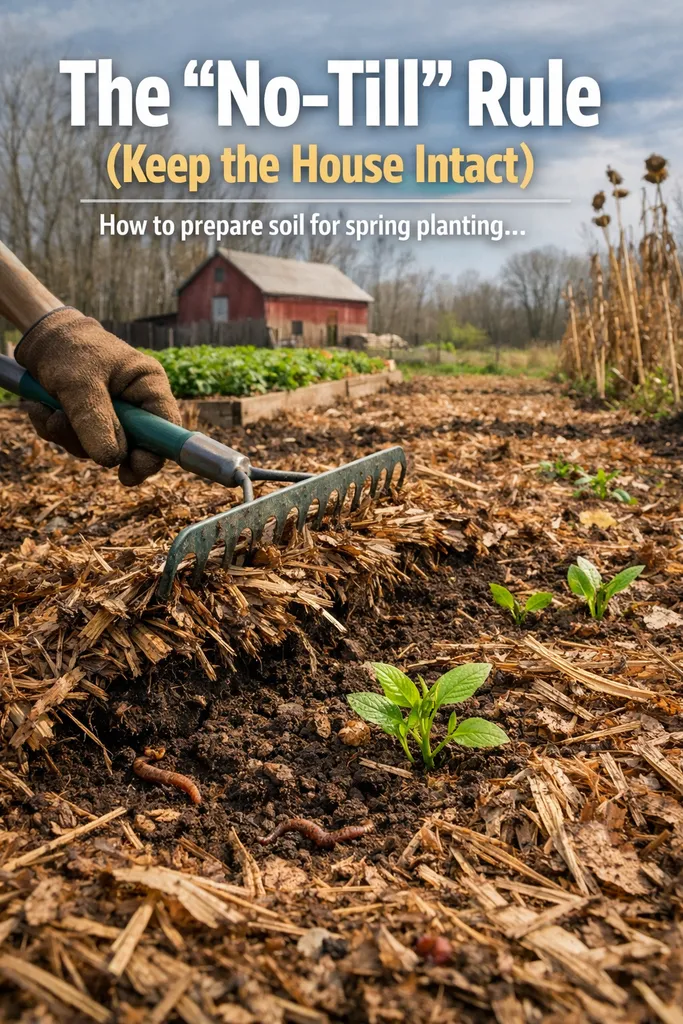
It’s hard not to get the tiller and turn that earth until it resembles chocolate cake. Don’t do it. Soil has this complex architecture of these fungal networks (mycelium) and worm tunnels. Tilling is like an earthquake, killing off these structures and soil-dwelling beneficial organisms that actually feed your plants.
- The Secret: Instead of digging, layer your amendments on top. Let the rain and the earthworms do the heavy lifting of pulling nutrients down.
2. The Golden Ratio: Compost & Castings
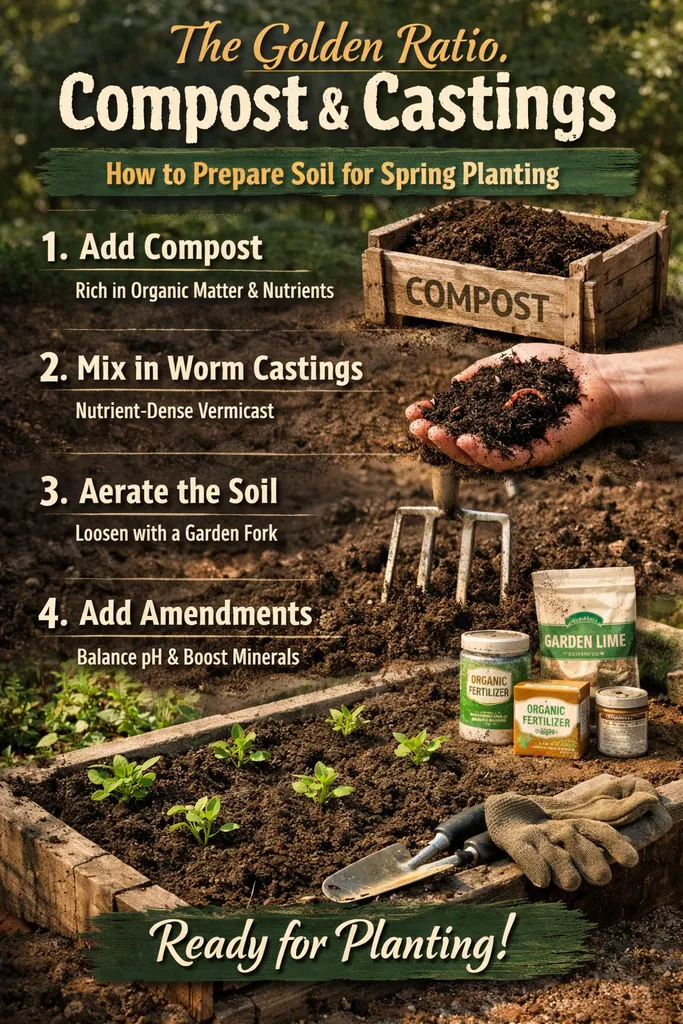
If soil is the engine, compost is the high-octane fuel. But not all “dirt” is created equal.
- Compost: Provides the bulk organic matter that improves soil structure and water retention.
- Worm Castings: This is “black gold.” Castings are packed with plant-available nitrates and beneficial microbes that regular compost sometimes lacks.
- Action: Add a 2-inch layer of high-quality compost mixed with a dusting of worm castings to your beds.
3. Wake Up the Microbes with “Sugar”
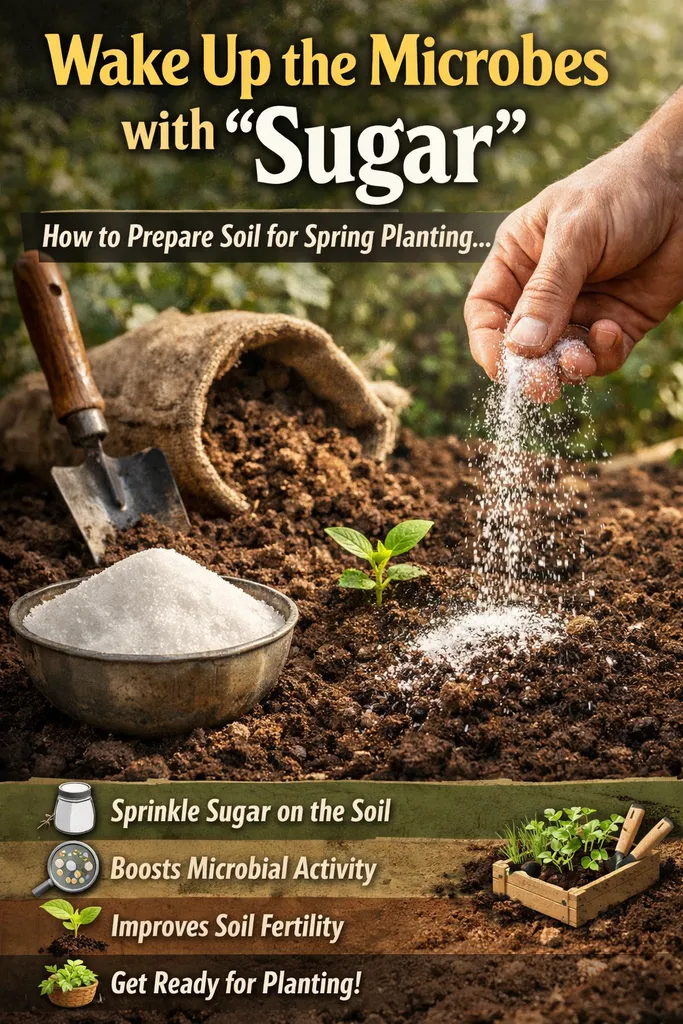
Early spring soil can be “sleepy” because the microbial life is still dormant from the cold. You can jump-start the ecosystem by providing a simple carbon source.
- The Secret: Use Unsulfured Blackstrap Molasses.
- How to do it: Mix 1 tablespoon of molasses per gallon of water and drench your beds. The sugar provides an instant energy boost to the bacteria, which then start breaking down organic matter for your plants.
4. Mineralize with Rock Dust
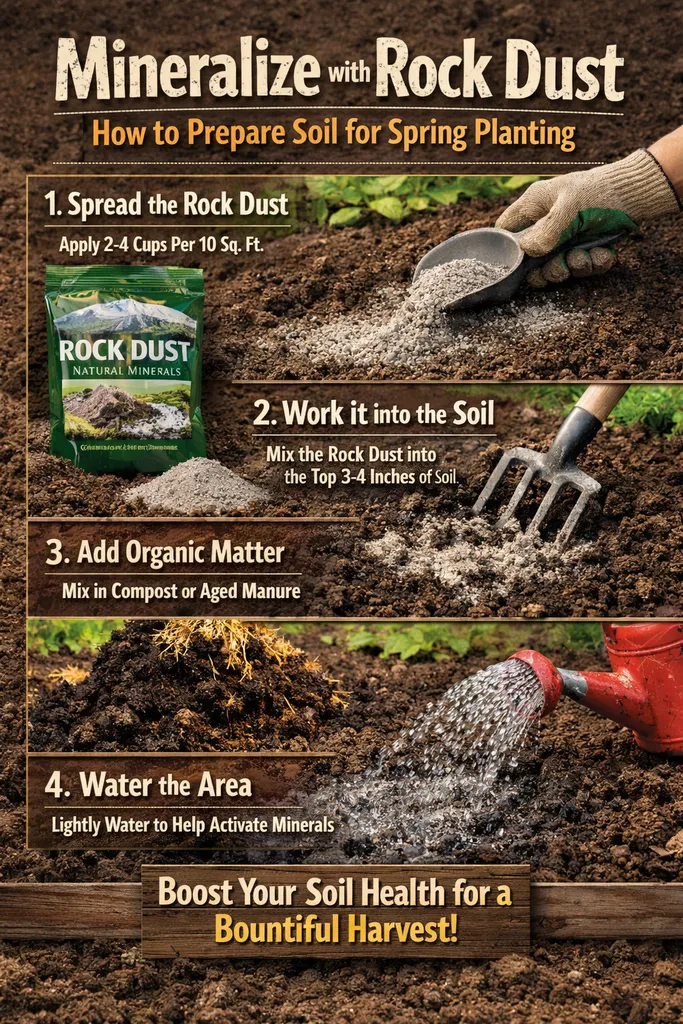
Plants need more than just Nitrogen, Phosphorus, and Potassium (N-P-K). They need trace minerals like magnesium, calcium, and silica to build strong “immune systems.”
- The Secret: Apply Azomite or Basalt Rock Dust.
- Why it works: These volcanics dust have as much as 70 trace minerals. It’s a sort of multivitamin for your dirt, which results in more nutrient-dense vegetables and more fragrant flowers.
5. The “Living Mulch” Strategy
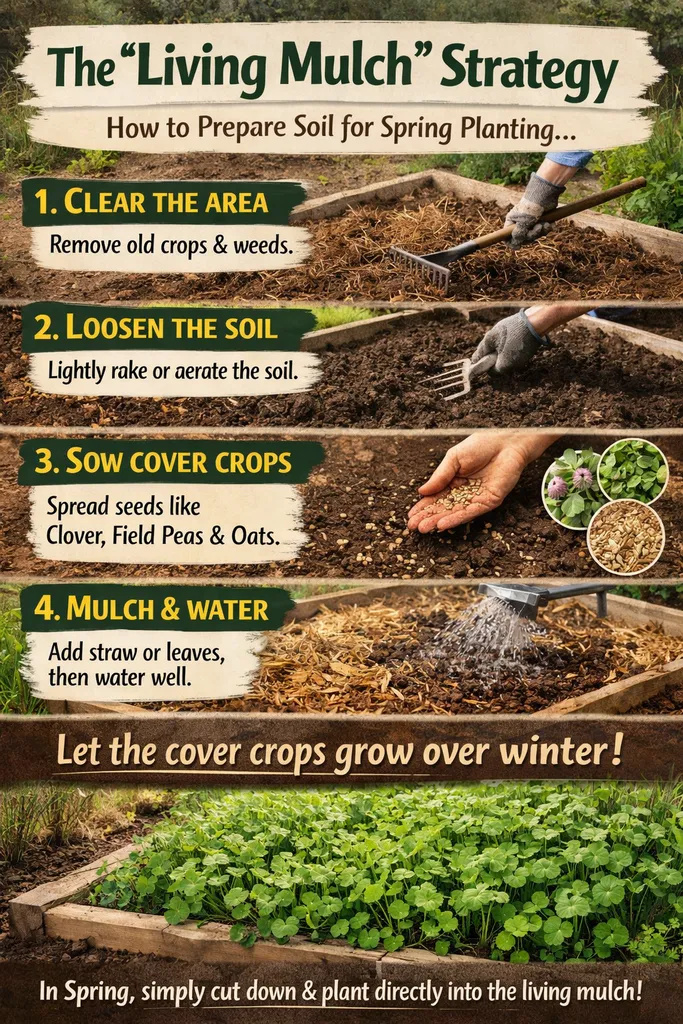
Bare soil is stressed soil. When soil is exposed to the sun and wind, it dries out and the top layer of microbes dies off.
- The Secret: Never leave the ground naked.
- Action: Once you prepare your soil, cover it as soon as possible with straw, shredded leaves or — even better — a “living mulch,” like clover. That retains moisture and stabilizes temperature.
Spring Prep Checklist
| Action | Material | Benefit |
| Feed | Finished Compost | Improves soil structure |
| Boost | Worm Castings | Instant nutrient uptake |
| Activate | Molasses Solution | Wakes up beneficial bacteria |
| Fortify | Rock Dust | Adds 70+ trace minerals |
| Protect | Straw or Mulch | Prevents erosion and drying |
Step by step How to Prepare Soil for Spring Planting
Step 1: The Timing is Everything—The “Squeeze Test”
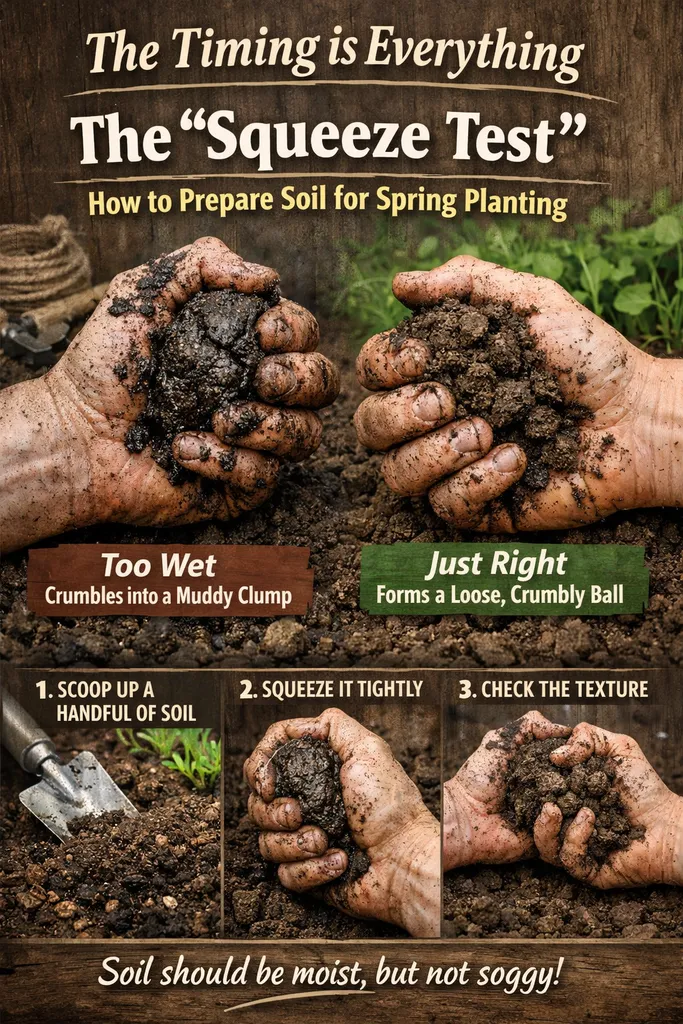
The number one rookie mistake is doing something too soon. And working with soil too wet is a disaster writing to happen. Digging or tilling soggy soil compacts it, forcing out the air pockets that roots and beneficial organisms rely on to thrive. This results in hard, cloddy soil that can take years to rectify.
So how do you know when it’s time? Never mind the date on your calendar; the soil will tell you. Go to your garden and grab a handful of dirt from several inches beneath the top. Give it a firm squeeze.
- If it forms a tight, sticky ball that doesn’t crumble when you poke it: It’s too wet. Wait another week and test again.
- If it crumbles easily through your fingers: It’s perfectly ready to work .
This handy “squeeze test” is your golden ticket to ideal soil prep. You want to work your beds when the soil is damp, but not waterlogged — usually on a dry, windy day after any heavy rains have long passed.
Step 2: Clean Up—But Don’t Be Too Tidy
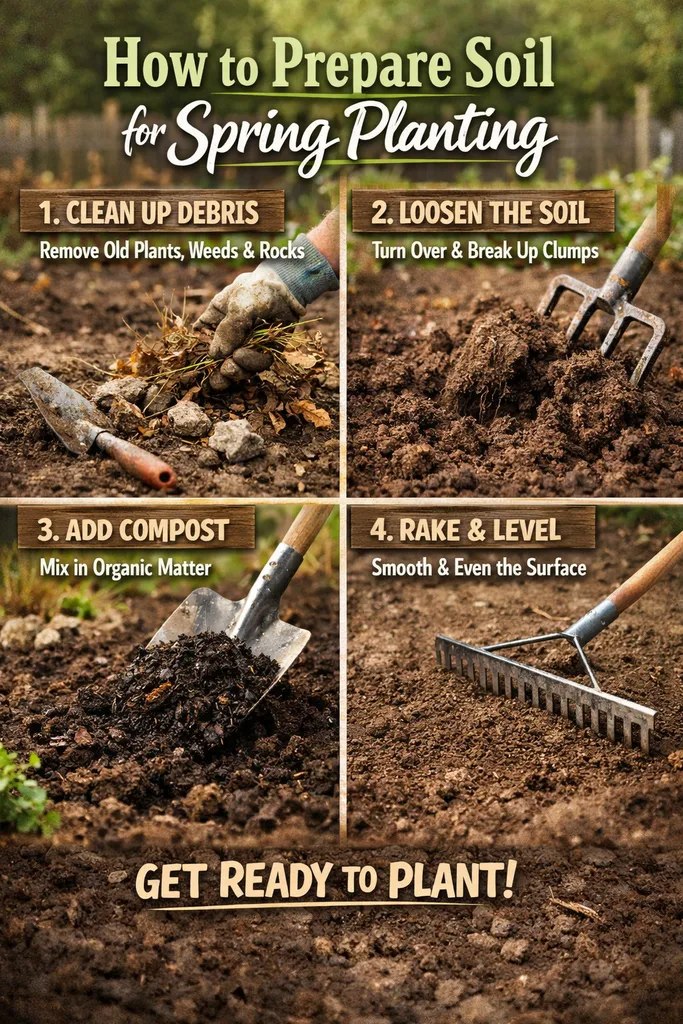
Once the soil is workable, it’s gentle cleanup time. First, remove winter detritus that may remain: large stones, downed limbs and dead plant matter from the previous year. Old growth can carry pests and diseases through the winter, so eliminating it provides your new plants with a clean slate.
2026 Important Update: Be a Pollinator Hero! As you dirt-clean, remember: not all debris is bad. Many native bees and beneficial insects hibernate in hollow stems or beneath leaves. To help your local ecosystem, leave a small pile of stems and leaves in a quiet corner of your yard or bind hollow stems together and place them upright in a protected area. This small act of “unkemptness” creates valuable habitat for the very insects that will pollinate your garden.
During cleaning, deal with the first wave of spring weeds. If you act now, those earlier weeds can usually be pulled easily after a rain. Hoeing on a sunny, breezy day is great; it cuts the weeds from their roots, and the sun wipes them out quickly. Taking them out now keeps them from going to seed and becoming a much bigger problem later.
Step 3: The Most Important Step—Test Your Soil (Don’t Skip This!)
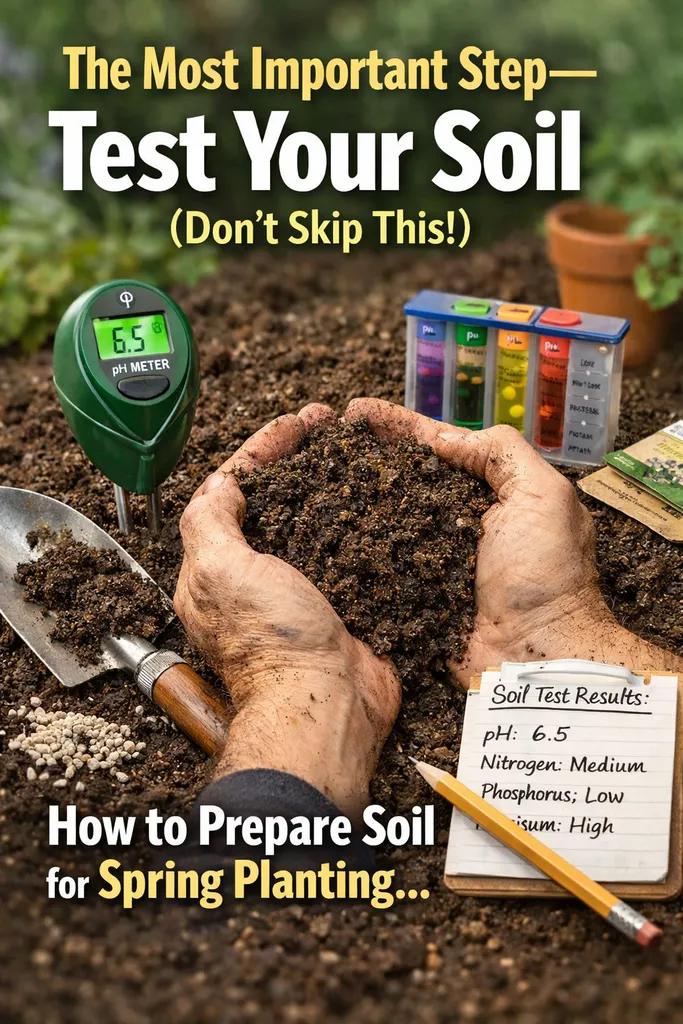
Before you add a single bag of compost, before you dust on any fertilizer, you need to know what is already in your soil. Calculating is hit-or-miss; over-fertilizing leads to nutrient imbalances that stress plants and can pollute local waterways.
It’s just like cooking — you don’t put salt in the dish until you taste it. Your “taste test” is a soil test. It tells you your soil’s pH (how acidic or alkaline it is) and its current nutrient levels (such as nitrogen, phosphorus and potassium).
- Why pH Matters: Soil pH determines how well plants can access nutrients. If the pH is too high or too low, essential nutrients can become “locked” in the soil, unavailable to your plants, no matter how much fertilizer you add .
- How to Test:
- Dig down 6-8 inches in 5-6 different spots across your garden.
- Take a small sample from each hole and mix them all together in a clean bucket. This gives you a representative sample of your entire garden.
- Remove any rocks, roots, or bugs.
- Send this mixed sample to a local extension service or use a reliable at-home test kit .
Your test results will tell you exactly what you need to add. For example, you might need to add lime to raise the pH of acidic soil, or sulfur to lower the pH of alkaline soil .
Step 4: Feed the Soil, Not Just the Plants—Add Organic Matter
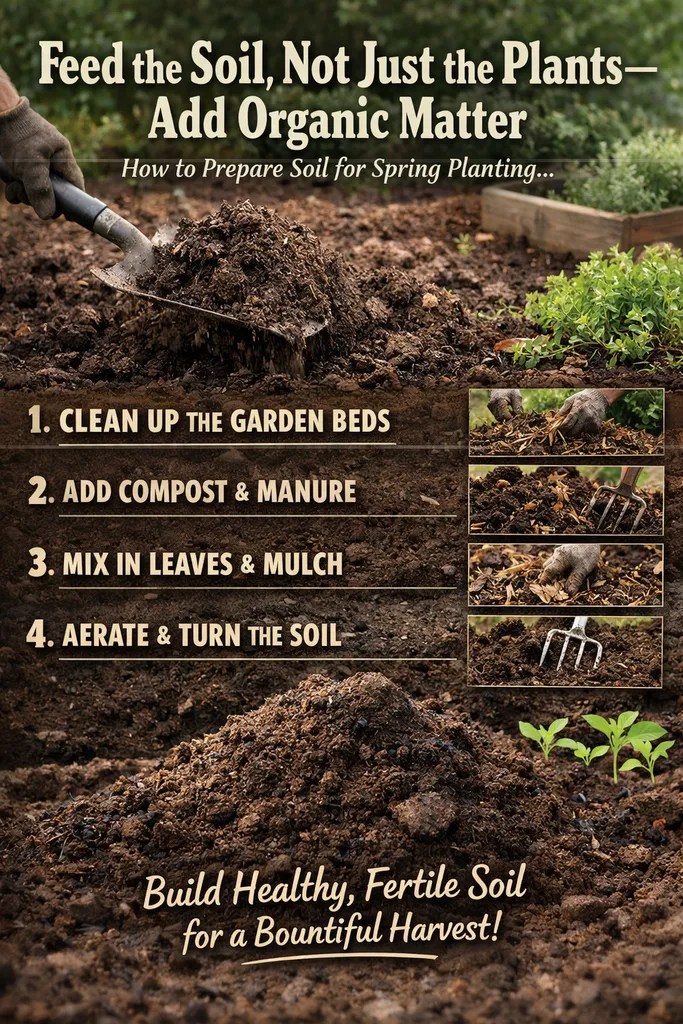
Now for the best part: adding organic matter. This is the single best thing you can do to your garden. Organic matter (such as compost) is the magic ingredient that allows both heavy clay and sandy soil to do those things — structure, drainage and fertility.
Your Goal: Add a 1 to 3-inch layer of organic matter over your bare soil . Excellent sources of organic matter include:
- Your Own Compost: The gold standard. It’s free, sustainable, and teeming with life .
- Well-Rotted Manure: A great source of nutrients, but ensure it’s well-composted to avoid burning plant roots .
- Leaf Mold: Simply decomposed leaves. It’s fantastic for improving soil structure .
- Purchased Products: If you don’t have your own, look for peat-free organic compost or finely ground bark dust .
How to Apply (The No-Dig Way): Ted, you don’t have to double-dig your garden! In fact, aggressive tilling breaks up the fragile fungal networks and soil architecture you’ve worked to establish. Instead, just scatter your organic matter on the surface of the soil. For most garden situations, it is sufficient to fork or rake it lightly into the top couple of inches. If you are a practitioner of a “no-dig” method, you can even leave the film of compost on top as a mulch; earthworms will naturally incorporate it into your soil for you.
You may need to loosen it first if you are establishing a brand new bed or have severely compacted soil. Using a broadfork or garden fork, rock gently back and forth, creating channels for air and water while avoiding flipping the soil layers.
Step 5: Final Touches—Rake and Wait
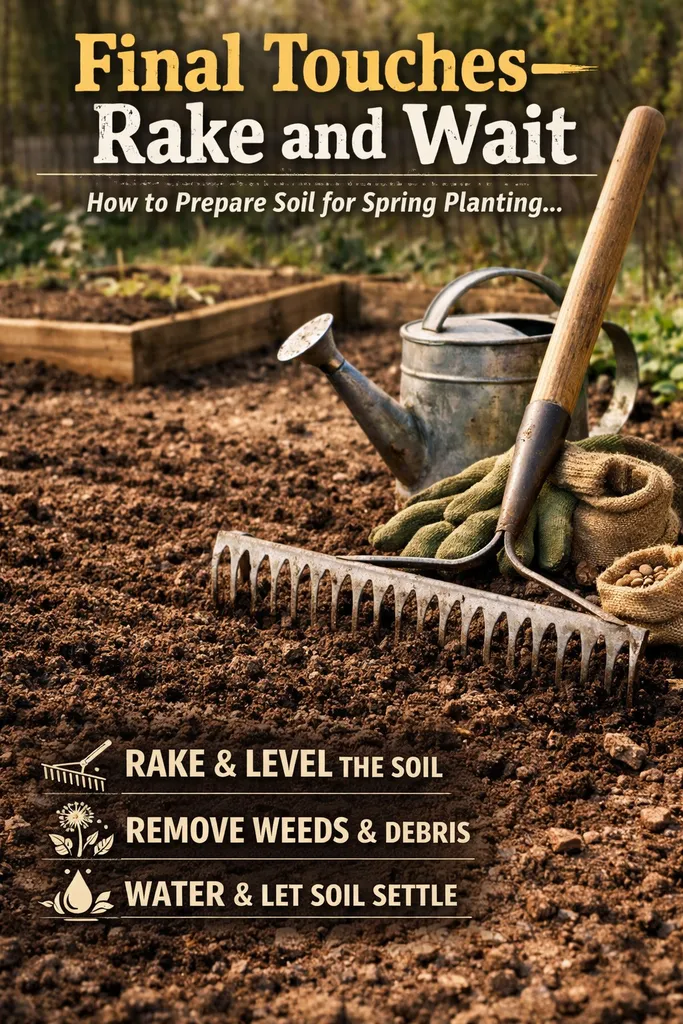
After incorporating your organic matter, rake the surface level to a “fine tilth,” — a crumbly smooth seedbed. This is ideal for small seeds to touch the soil and germinate. Remove any significant clumps, large stones and any old roots you find along the way.
Your soil is all mixed, prepped and ready to go! But if your weather is still cool, resist the temptation to plant. Many seeds, including tomatoes, beans and squash, require warm soil to sprout. If planted in cold, wet soil, they will rot. Use a soil thermometer to measure temperature at 2-3 inches. Cool-season crops, such as peas and lettuce, get by on a consistent soil temperature of 5–10°C (41–50°F), but for warmth-loving plants such zingy courgettes and cucumbers hold out until your soil has warmed to at least 13°C (55°F).
FAQ
1. What if I didn’t test my soil? Can I still add compost?
Yes! Although a soil test is best, it is safe and helpful to add a 1-2 inch layer of high quality, organic compost for almost all gardens. It enhances soil structure and offers a wide range of nutrients without the high risk of overdose that synthetic fertilizers carry.
2. Should I till my garden or use a no-dig method?
In 2026, experts strongly recommend no-dig for the heath of your soil. Tilling breaks up soil structure, damaging beneficial fungi and bringing weed seeds to the surface. No-dig techniques, which involve just adding compost on top, protect the soil ecosystem and demand less effort.
3. Can I use bagged topsoil instead of compost?
Topsoil is the “dirt” part of the earth, and compost is decomposed organic material. They serve different purposes. Topsoil can be used to fill raised beds or level ground, but it lacks the fertility and biological life to enrich soil that compost provides. Spring prep means a biological boost of compost.
4. How do I prepare soil for a brand-new flower bed?
The process is the same! First, hand pull or smother with cardboard existing grass/weed for a couple of weeks. Then follow the above steps: check soil moisture, broken backed up areas with a fork, test and amend based on results and finally top it off with 2-3 inches of compost.
5. What’s the best way to prepare soil for vegetables?
Vegetables are heavy feeders, making a generous compost application important. In particular, pH: Pay special reference to your soil test for pH. Most of them favour the pH (6,0-7,0) slightly acid or neutral. Later, make sure your soil is loose and well-draining to support their root systems.
6. Is it okay to prepare soil when it’s raining?
No. Working wet soil is one of the worst things you can do. This causes extreme compaction which destroys the soil structure. Mistake: Trying to amend wet soil The fix: Wait until your soil is dry enough to pass the “squeeze test” before you prep (even if that means waiting a week).
7. Should I add fertilizer at the same time as compost?
It depends on your soil test. If your test shows a particular deficiency, add an organic fertilizer (blood meal for nitrogen, say, or bone meal for phosphorus) along with your compost. But for many gardens, a generous amount of high-quality compost offers all the nutrition necessary to get off to a great start.
8. How deep should I prepare the soil?
For most flowers and vegetables, it is enough to prepare the surface 6-12 inches. If accordingly loosening compacted layers with a fork, shoot for that 12-inch depth. With no-dig methods, just enrich the top few inches — and nature takes care of the rest.
9. What is green manure and should I plant it?
Green manures (or cover crops) are plants,clover or rye for example, that are cultivated specifically to enrich the soil. They are typically sown in the fall and then worked into the soil in the spring. But if you didn’t plant one last fall, no worries — just be sure to add compost now. If you pick them, cut them by the ground, and allow the leaves to starve for a week before sticking in the ground, or lightly mix in.
10. How do I prepare soil in a raised bed?
Raised beds are often easier! Just top the bed with a 2-inch layer of fresh compost. If the soil level has sunk quite a bit, you can add more topsoil along with your compost. Lightly rake it in and you’re set for planting.
11. Can I reuse potting soil from last year’s containers?
You can use, but don’t overuse it straight from the pot. Dump the old soil into a wheelbarrow, pull out any wayward roots and mix in 1/3 new compost, plus possibly some perlite to improve aeration. This will renew nutrient availability and structure.
12. What’s the best mulch to use after planting?
Once your seeds are sprouted or your transplants in the ground, you can apply a mulch for moisture retention and weed suppression. Good choices are straw, shredded leaves, untreated grass clippings, or more compost. Spread a 2-inch layer, avoiding the direct stems of your plants.
Final Verdict
Preparing your soil for spring planting is much more than a chore; it’s an act of partnership with nature. It’s about preparing for the season of growth, beauty and food. After this 2026 beginner’s guide, you know that the secret to a flourishing garden is not fancy products or back-breaking labor but caring for and understanding the living world under our feet.
Be patient — sow when your soil is primed. Be not so much a gardener as an observer: test your soil, then listen to what it tells you. And be nice — practice no-dig methods that protect the complicated web of life in your garden. By adding organic matter such as compost, you are having dinner with not just your plants but with an entire ecosystem that will work for you all season.
Don’t rush this year. Follow these steps one at a time, and you will be rewarded with plants that are stronger, healthier and better able to withstand pests and disease. Your garden will show the results of a good solid foundation. Now, get your hands dirty — your most glorious and richest garden to date is waiting just under the surface.

Leave a Reply